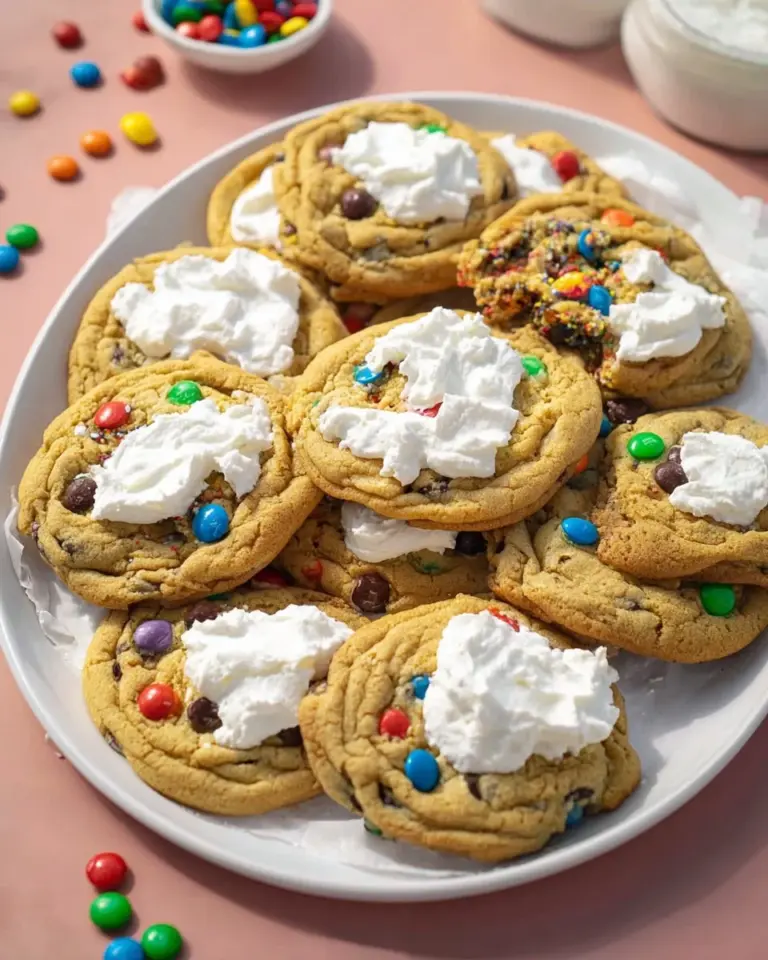
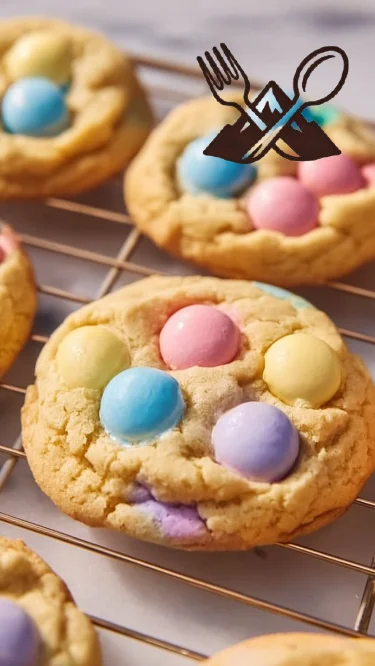
Each spring, as the flowers begin to bloom and the days grow warmer, my kitchen transforms into a vibrant hub of colorful baking adventures. One of my absolute favorite treats to whip up are Easter Funfetti Cookies. These delightful cookies are not just a joyful nod to the holiday; they encapsulate the spirit of celebration with their rainbow of pastel sprinkles reminiscent of Easter eggs!
Growing up, our family had a sweet tradition of gathering in the kitchen to create something special for Easter—this recipe holds a place in my heart because it brings back memories of laughter, flour fights, and the sweet scent of cookies wafting through the house. Unlike store-bought varieties, these cookies are rich, buttery, and bursting with flavor, making them a real crowd-pleaser. Plus, they have that perfect soft-baked texture that melts in your mouth.
In this post, I’ll guide you step-by-step to create your own batch of Easter Funfetti Cookies, sharing tips and tricks to make them even more special. Prepare to fill your kitchen with laughter, love, and the tantalizing aroma of freshly baked cookies!
What Are Easter Funfetti Cookies?
Easter Funfetti Cookies have their roots in the classic “funfetti” concept—adding colorful sprinkles to cake or cookie batter makes for a cheerful treat. They are soft, chewy cookies that boast a delightful crunch from vibrant pastel sprinkles. Each bite is a combination of rich buttery flavor and a sweet hint of vanilla, bringing a smile to anyone who takes a bite.
What makes these cookies truly unique is the joyful energy they bring along with them. They’re perfect for family gatherings, school events, or just a fun baking day at home. The colorful sprinkles create a festive ambiance, making them an ideal addition to your Easter celebrations. Whenever you take a bite, the sweetness and joy remind you of those cherished moments spent in the kitchen with loved ones.
Why You’ll Love This Recipe
Comfort with a Twist: There’s something incredibly comforting about classic cookies, but this recipe introduces a whimsical twist with pastel sprinkles. It’s a nostalgic treat that sets the stage for a fun gathering with friends and family.
Superior to Store-Bought: Forget the bland and overly sweet cookies from the store! These homemade Easter Funfetti Cookies are fresher, more flavorful, and bursting with personality. Plus, you control the ingredient quality—no preservatives here!
Budget-Friendly Baking: Making cookies at home can save you a good chunk of change compared to buying a box of fancy cookies. This recipe utilizes simple pantry staples to create a big batch—great for sharing.
Customization Galore: Want to swap in chocolate chips? How about adding nuts or different types of sprinkles? You can easily personalize this recipe to match your own taste preferences or dietary needs.
Easy for Everyone: Whether you’re an experienced baker or a novice, this recipe is straightforward and will yield delicious results every time. The step-by-step instructions are easy to follow, and you’ll be rewarded with delightful cookies in just about 30 minutes!
Ingredients
Below is the ingredient list for your Easter Funfetti Cookies, complete with tips for quality and prep:
- 2 3/4 cups all-purpose flour: Use a high-quality brand like King Arthur Flour for best results.
- 1 teaspoon baking soda: Make sure it’s fresh for those perfect puffy cookies!
- 1/2 teaspoon salt: Enhances the flavors; don’t skip it!
- 1 cup unsalted butter, softened: Bring to room temperature for easy creaming; use brands like Land O’Lakes for rich flavor.
- 1 cup granulated sugar: Sweetness with a lovely crisp texture.
- 1 cup packed brown sugar: For that chewy, gooey goodness—light or dark both work.
- 2 large eggs: Room temperature helps them blend in seamlessly.
- 2 teaspoons vanilla extract: Pure extract is best for an aromatic depth.
- 1/2 cup pastel sprinkles: These are the stars of the show! Choose a mix of colors for a festive look.
Step-by-Step Instructions
Preheat your oven to 350°F (175°C): This is a crucial step to ensure even baking.
In a bowl, whisk together flour, baking soda, and salt; set aside.: This helps ensure no clumps and that your leavening agents are evenly distributed.
In a large bowl, cream together butter, granulated sugar, and brown sugar until smooth.: You want a light and fluffy mixture. If it looks slightly yellow and creamy, you’re on the right track!
Beat in the eggs one at a time, then stir in the vanilla.: Make sure the eggs are well incorporated before adding the next.
Gradually blend the dry ingredients into the wet mixture.: Do this in batches to avoid flour clouds and ensure a well-mixed dough.
Fold in the pastel sprinkles.: Be gentle to keep them intact; nobody wants a cookie that looks like it had a sprinkle fight!
Drop dough by rounded tablespoons onto ungreased baking sheets.: Make sure to leave space between each dollop. These cookies like to spread!
Bake for 10-12 minutes or until edges are lightly golden.: Watch for the edges to turn golden, while the centers should look just a tad underbaked.
Remove from the oven and allow to cool on baking sheets for a few minutes before transferring to wire racks to cool completely.: This helps them set perfectly while keeping them soft.
Each step is designed to help you achieve the softest, chewiest, and most colorful cookies. Don’t rush through these steps—enjoy the process!
Expert Tips & Tricks
Use Room Temperature Ingredients: Let your butter and eggs come to room temperature before baking. This guarantees that they mix evenly.
Chilling the Dough: For even thicker cookies, refrigerate the dough for 30 minutes before baking. It also enhances the flavor.
Avoid Overmixing: When incorporating the flour, mix just until combined. This prevents the cookies from being tough.
Sprinkle Options: If you can’t find pastel sprinkles, feel free to use mini chocolate chips or chopped candies for a different look and flavor experience!
Storage Recommendations: Store your cookies in an airtight container at room temperature to keep them soft and delicious for up to a week.
Make-Ahead: You can prepare the dough in advance and freeze it. Just roll it into balls and freeze them. When ready to bake, pop them straight into the oven without thawing!
Serving Suggestions
These cheerful Easter Funfetti Cookies are perfect on their own, but if you want to elevate your dessert game, consider serving them alongside a scoop of vanilla ice cream or a dollop of whipped cream. Presentation-wise, arrange the cookies on a colorful platter and garnish with fresh flowers or edible spring-themed decorations to wow your guests. They’re perfect for Easter brunch, family gatherings, or as a sweet surprise for a loved one.
Variations & Substitutions
- Chocolate Chip Funfetti Cookies: Substitute half of the pastel sprinkles for semi-sweet chocolate chips for a delightful chocolatey taste.
- Gluten-Free Option: Use a gluten-free all-purpose blend. Brands like Bob’s Red Mill make excellent blends that often include xanthan gum, which helps with texture.
- Vegan Version: Replace the butter with coconut oil and substitute the eggs with flaxseed meal or applesauce.
Nutrition & Storage Info
- Prep Time: 15 minutes
- Cook Time: 10-12 minutes
- Total Time: 25-27 minutes
- Yield: Approximately 24 cookies
- Estimated Calories per Serving: 150 calories
- Storage: Store in an airtight container at room temperature for up to one week or freeze for up to three months.
FAQ Section
Can I use salted butter?
- Yes! Just omit additional salt in the recipe.
Why are my cookies not spreading?
- This could be due to overmixing your dough or using cold butter. Ensure the butter is softened to room temperature for optimal spreading.
How do I know when my cookies are done?
- Look for lightly golden edges. The centers should appear slightly underbaked but will firm up as they cool.
Can I add chocolate chips instead of sprinkles?
- Absolutely! Swapping out sprinkles for chocolate chips will give a deliciously rich flavor.
What if I don’t have all-purpose flour?
- You can use cake flour for a lighter texture or a gluten-free flour blend.
What’s the best way to store my cookies?
- Store them in an airtight container to keep them fresh. For longer storage, consider freezing them.
Can I make these in advance?
- Yes! The dough can be made ahead of time and frozen, or the baked cookies can be stored for a week.
What if I want a stronger vanilla flavor?
- You can increase the vanilla extract to 3 teaspoons for a more pronounced vanilla taste.
Can I use different colored sprinkles?
- Of course! Feel free to use any colored sprinkles to match your celebrations or preferences.
Are these cookies suitable for kids?
- Definitely! Kids love the colorful sprinkles, and they’re a fun treat for any age!

Conclusion
Easter Funfetti Cookies are more than just a treat; they’re a celebration in every bite, evoking sweet memories of family traditions. Easy to make and bursting with colorful joy, this recipe is sure to bring smiles to your loved ones’ faces. I encourage you to give it a try and share your experiences with me! Don’t forget to check out other related recipes on my blog for more delicious adventures.
Irresistible Peach Butter Swim Biscuits: A Sweet Slice of Comfort
Happy baking!