As the first hints of spring begin to melt away the last remnants of winter, my kitchen fills with the delightful scent of coconut and chocolate, announcing the arrival of one of my all-time favorite Easter treats: Easter Bunny Coconut Tails. Every Easter since I can remember, my family has gathered together to whip up these adorable, fluffy bites, bursting with nostalgic flavors that whisk me away to childhood. The tradition of creating these sweet little bunnies has become a cherished memory—one that I fondly recreate to share with my own children.
What makes these coconut tails so special? They’re not only delicious with a perfect balance of sweetness, but they also come together quickly and easily, making them a stress-free addition to your holiday spread. Trust me, this recipe is much better than anything you can find at the store—it’s fresher, customizable, and radiates warmth and love that only homemade treats can offer.
In this post, I promise to guide you through each joyful step of making Easter Bunny Coconut Tails, so you can turn the ordinary into extraordinary. Let’s bring your spring celebration to life and create an Easter memory that your kids will hold dear just as I do!
What Are Easter Bunny Coconut Tails?
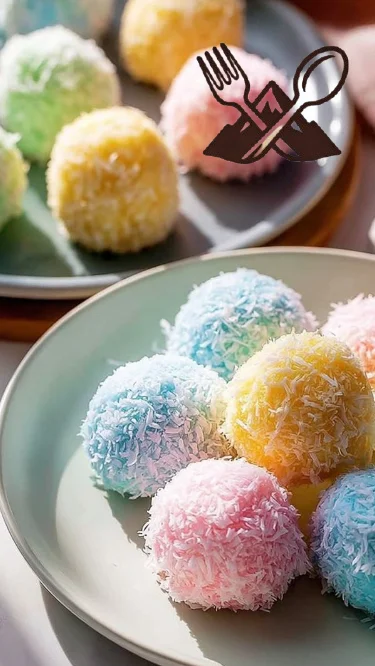
Easter Bunny Coconut Tails are delightful no-bake treats that marry the tropical taste of shredded coconut with creamy sweetened condensed milk, all encased in rich, luscious white chocolate. The final touch? Cute little mini chocolate chips that mimic the eyes and tails of our beloved Easter bunnies. The texture is wonderfully chewy thanks to the coconut, while the white chocolate coating adds a satisfying crunch.
These treats are perfect for Easter gatherings, springtime celebrations, or simply for those days when you crave something sweet and playful. Whether you’re crafting them for a family get-together or a cozy night in, Easter Bunny Coconut Tails make every occasion just a little sweeter.
Why You’ll Love This Recipe
Quick and Easy: This recipe takes less than an hour of hands-on time, making it a perfect sweet fix during your busy holiday prep.
Cost-Effective: Why splurge on store-bought treats? With just a handful of pantry staples, you can create a delightful dessert at a fraction of the cost.
Endless Customizations: Feel free to swap out flavors by using dark or milk chocolate instead of white, or add nuts for an extra crunch. With a little imagination, you can make these tails uniquely yours.
Kid-Friendly Fun: Kids love to help with this recipe! From rolling the coconut balls to decorating with chocolate chips, it’s a fun family activity we cherish each year.
Memorable Presentation: These treats are not only delicious but also visually appealing. Their whimsical shapes and decorations will steal the show on your dessert table, and trust me, everyone will be Instagramming their gorgeous bunny tails!
Ingredients
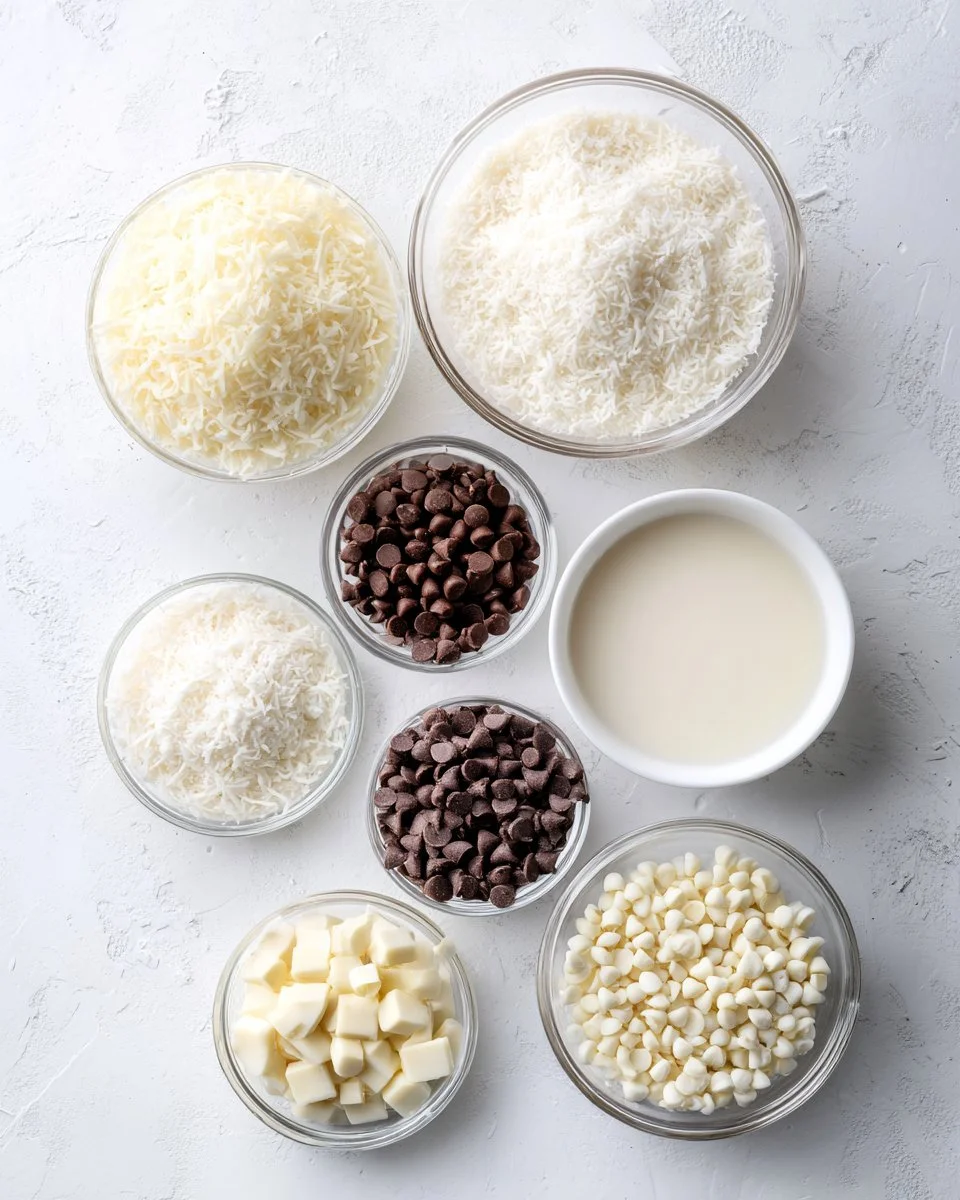
2 cups shredded coconut: Use sweetened shredded coconut for that extra bite of sweetness. If you’re looking for a subtler flavor, unsweetened coconut is a great alternative.
1 cup sweetened condensed milk: Opt for a high-quality brand, as it truly makes a difference in flavor and creaminess.
1 teaspoon vanilla extract: Pure vanilla extract lends a lovely depth of flavor.
1 cup white chocolate chips: Choose a brand that melts easily for a smooth coating. Ghirardelli works wonders here.
Mini chocolate chips: Great for cuteness overload! These will be used to give your bunnies their adorable little eyes and fluffy tails.
Prep Notes: Ensure your butter (if using in any variations) is at room temperature to ease mixing.
Step-by-Step Instructions
Mix the Ingredients: In a large mixing bowl, combine the shredded coconut, sweetened condensed milk, and vanilla extract. Mix until well blended, and the mixture is sticky and cohesive.
Shape into Balls: Using your hands, roll the mixture into small balls, about the size of a tablespoon. Place them on a parchment-lined tray. You should have around 20-24 coconut balls.
Chill: Pop the tray in the freezer for about 30 minutes. This allows the balls to firm up, ensuring they hold their shape when dipped in chocolate.
Melt the White Chocolate: In a microwave-safe bowl, melt the white chocolate chips in 30-second intervals, stirring between each, until smooth and fully melted.
Coat the Coconut Balls: Remove the coconut balls from the freezer. Dip each one into the melted white chocolate and return it to the tray. Use a fork for easier handling, allowing excess chocolate to drip off.
Decorate: Before the chocolate sets, place mini chocolate chips on each coconut ball to create the eyes and a few for the tails. Let your creativity soar!
Set to Cool: Allow the white chocolate to cool completely before serving. This will give you a lovely, crunchy coating on each delicious tail.
Chef’s Tip: If your chocolate begins to harden while dipping, just pop it back in the microwave for a few seconds to re-melt.
Expert Tips & Tricks
Storage: Keep your Easter Bunny Coconut Tails in an airtight container at room temperature for up to a week. If you want them to last longer, keep them in the fridge or freezer.
Make-Ahead: You can prepare the coconut balls ahead of time. Just leave them uncoated, and they’ll stay fresh in the fridge for a few days before you dip them in chocolate.
Troubleshooting: If your coconut mixture is too dry, add a bit more sweetened condensed milk to help it come together. If it’s too wet, add more coconut until it reaches a manageable consistency.
Flavor Variations: There’s no limit to how you can flavor your coconut! Consider adding almond extract for a nutty twist or a sprinkle of cinnamon for that extra warmth.
Serving Suggestions: Serve these treats alongside a fruit platter or a rich chocolate tart for a balanced dessert spread.
Serving Suggestions
Easter Bunny Coconut Tails are delightful all on their own, but they pair beautifully with many springtime favorites. Consider serving them alongside fresh strawberries or a light citrus salad to balance the sweet richness. For a fun presentation, arrange them on a platter with Easter-themed decorations like mini egg candies or vibrant spring flowers. These bunny tails also make charming gifts; simply package them in cute, clear bags tied with pastel ribbons for a sweet edible treat to share!
Variations & Substitutions
Chocolate Coating: Try dark or milk chocolate as an alternative to white chocolate for a richer flavor profile.
Coconut Flavors: Incorporate lime zest for a tropical twist or even almond or orange extract for an additional flavor level.
Dietary Adaptations: For vegan versions, use dairy-free coconut milk and vegan chocolate chips to keep the recipe cruelty-free.
seasonal touch: Add a splash of dried cranberries or a sprinkle of colored sprinkles to match your holiday theme or event.
Nutrition & Storage Info
- Prep Time: 15 minutes
- Cook Time: 5 minutes (for melting chocolate)
- Total Time: Approximately 1 hour (including chilling)
- Yield: About 20 serves (depending on size)
- Estimated Calories: Approximately 100 calories per tail
- Storage: Best stored at room temperature in an airtight container for up to one week; they can also be refrigerated for up to two weeks or frozen for a month.
FAQ Section
Can I use unsweetened coconut?
- Yes! Unsweetened coconut can be used, but you may wish to adjust the amount of sweetened condensed milk to balance the sweetness.
Can I substitute other types of chocolate?
- Absolutely! Milk or dark chocolate can provide a different flavor profile that many enjoy.
How long will these keep?
- They last at room temperature for about a week. In the fridge, they can last up to two weeks, and if frozen, they’ll keep for a month.
Can I make these gluten-free?
- Yes! Every ingredient in this recipe is naturally gluten-free, making them a great treat for those with gluten sensitivities.
What if my chocolate hardens too quickly?
- If your chocolate hardens, just pop it back into the microwave in 10-second intervals to warm it up again.
Can I add nuts to the mixture?
- Yes! Finely chopped nuts such as almonds or pecans can add a delicious crunch to the coconut mixture.
Is there a dairy-free option?
- Definitely! Use dairy-free chocolate and coconut cream in place of sweetened condensed milk.
How can I make them vegan?
- For a vegan version, swap out sweetened condensed milk for a vegan alternative, and use dairy-free chocolate.
Can I prepare these in advance?
- Yes! You can make the coconut balls ahead of time and coat them in chocolate closer to serving time.
What other decorations can I use?
- You can get creative! Consider using edible glitter, colored sugar, or even mini marshmallows for an even cuter look.

Conclusion
Easter Bunny Coconut Tails are not just a delightful treat; they are a celebration of spring and family traditions. With their whimsical shapes and joyful flavors, they’re bound to become a staple in your kitchen just like they have in mine. I encourage you to try this easy recipe and make your own sweet memories with loved ones.
I’d love to hear your thoughts! How did your bunny tails turn out? Did you customize them? Share your experiences in the comments, and check out our other festive recipes on the blog for more inspiration.
Decadent Root Beer Float Pie: A Nostalgic Twist on a Classic Treat
Happy baking!