Every summer, as childhood memories flood back, I find myself transported to my grandmother’s bustling kitchen, where the scent of freshly baked cherry pie would waft through the open windows. Her secret? A delightful Homemade Cherry Pie Filling that never failed to put smiles on our faces. Recapturing those warm moments and the joy of family gatherings drove my passion for reviving this timeless recipe. There’s something uniquely special about making your own cherry pie filling from fresh cherries—it’s a labor of love that embodies comfort food in every sweet bite.
What sets this Homemade Cherry Pie Filling apart from store-bought versions is the depth of flavor that comes from using fresh, ripe cherries and a pinch of nostalgia. This recipe is all about authenticity and freshness, making it the perfect choice for celebrations or cozy family dinners. In this post, I’ll guide you through crafting a cherry pie filling that will not only tickle your taste buds but also bring a sense of belonging to your kitchen. Get ready to unlock tips and tricks to create a luscious cherry filling that’s brimming with flavor and ready to become part of your family’s traditions, just like it became mine.
What Are Homemade Cherry Pie Fillings?
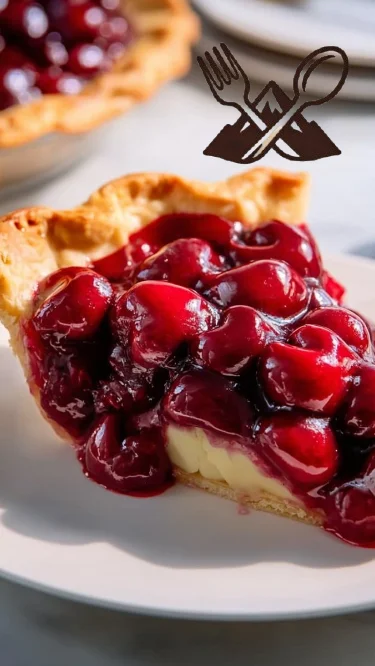
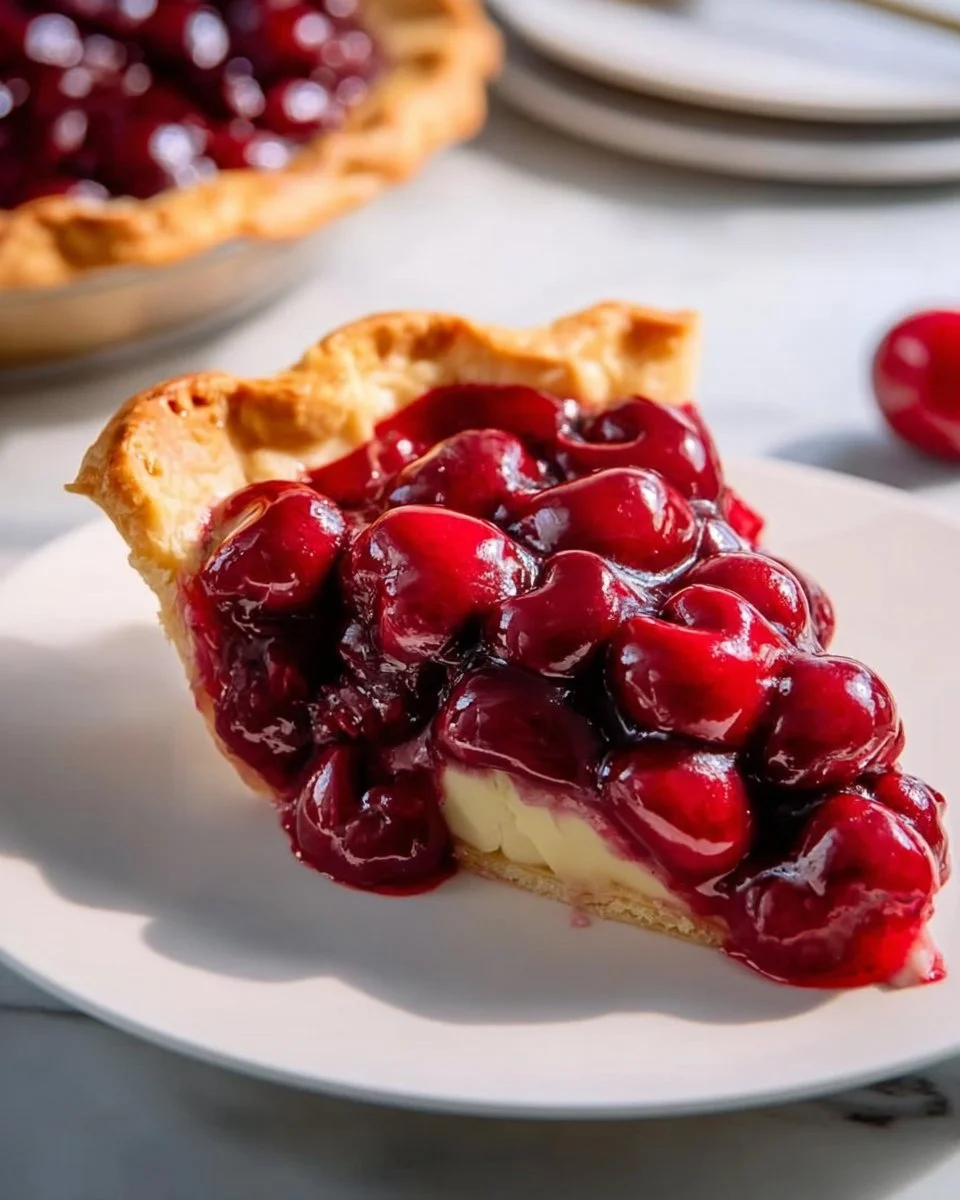
Homemade Cherry Pie Fillings are the heart and soul of a classic dessert—a burst of sweet and tart cherries steeped in a rich syrupy goodness, enchanting every bite. Originating from the needs of home bakers who wanted control over the taste and quality of their pies, this filling has transcended generations. The bright, ruby-red color combined with the glossy finish creates a visual feast that’s hard to resist.
The moment you take a spoonful, you’re greeted with the juicy, tender cherries that deliver a sweet yet slightly tangy flavor, enhanced by a hint of vanilla and citrus from the lemon juice. What makes homemade versions unique is the freshness and personal touch; you can tweak the sweetness or spice it up with your favorite flavors, cultivating something that fits your palate perfectly.
This recipe shines when you’re in the midst of pie-making, holiday baking, or simply wanting something special to brighten up your dessert repertoire. Whip up this cherry pie filling for Fourth of July cookouts or cozy winter evenings—it’s sure to spark joy.
Why You’ll Love This Recipe
Flavor that Shines: Unlike store-bought varieties that often contain artificial flavors and preservatives, this Homemade Cherry Pie Filling bursts with authentic cherry flavor. With ripe, fresh cherries, each spoonful encapsulates the essence of summer.
Cost-Effective: Making your own filling is often cheaper than buying prepared versions, especially when cherries are in season. Plus, you’ll save on the extra shipping costs associated with specialty ingredients.
Total Customization: You have control over the sweetness, tartness, and thickness of the filling. Want it sweeter? Add more sugar! Prefer a thicker texture? Simply adjust the cornstarch—it’s your masterpiece.
Quick and Easy: Don’t be intimidated by the thought of making your pie filling from scratch. This recipe is straightforward and comes together in about 15 minutes of active cooking time!
Versatile Use: Beyond pies, this filling can be used as a topping for pancakes, cheesecakes, or yogurt. Its versatile nature will inspire creativity in your cooking adventures.
Ingredients
For the Homemade Cherry Pie Filling, you’ll need:
- Fresh Cherries: The star of our show! Aim for sweet Bing or Rainier cherries for a burst of flavor.
- Sugar: Provides the necessary sweetness to balance the tartness of the cherries.
- Cornstarch: Acts as the thickening agent, giving that perfect gooey texture.
- Lemon Juice: Brightens the cherry flavor and adds a refreshing zing.
- Vanilla Extract: Adds a comforting warmth and complexity to the filling.
- Salt: Just a pinch enhances all the flavors without making it salty.
Special Notes:
- Ingredient Quality: Always choose the ripest and freshest cherries available. Organic options are often more flavor-packed.
- Prep Notes: Make sure your butter and any additional dairy, if used later in your dessert, are at room temperature for smoother incorporation.
- Brand Recommendations: I love using Lipton Key Lime Juice for its brightness, but fresh-squeezed lemon juice is also divine!
Step-by-Step Instructions
Pit and chop the fresh cherries. (about 10 minutes)
- Chef’s Tip: Use a cherry pitter for quick and easy work. Just ensure to slice each cherry in half to check for any pesky pits hiding inside!
In a medium saucepan, combine the cherries, sugar, cornstarch, lemon juice, vanilla extract, and salt. (2 minutes)
- Visual Cue: You should see a mix that resembles a colorful, glossy fruit cocktail.
Cook over medium heat, stirring constantly, until the mixture starts to thicken and bubble. (5-7 minutes)
- Important! Keep an eye on the mixture and stir continuously; this will prevent it from sticking to the bottom of the pan.
Remove from heat and let cool. (10 minutes)
- Chef’s Tip: It’s crucial to let it cool before using, as it will thicken further as it cools down.
Use in your favorite pie recipes or store in an airtight container in the fridge.
- Storage Tip: This filling will last about one week in the refrigerator, or three months if frozen.
Expert Tips & Tricks
Quality Cherries Matter: Invest in high-quality, ripe cherries for the best flavor. They are the centerpiece of your filling!
Adjust Sweetness: Taste before you cook; depending on the ripeness of your cherries, you may want to adjust the amount of sugar.
Thickening Agents: If you prefer a thicker consistency, gradually add more cornstarch mixed with a bit of water—as it simmers, the filling will thicken up beautifully.
Make Ahead: This filling is perfect to make ahead! Store it in an airtight container in the fridge for up to one week or freeze it for longer storage.
Troubleshooting: If your filling isn’t thickening properly, it’s likely the heat is too low. Increase the temperature slightly and allow it to bubble while stirring.
Experimentation: Don’t hesitate to experiment with spices like cinnamon or nutmeg to add a unique twist to your cherry filling.
Serving Suggestions
Homemade Cherry Pie Filling can be enjoyed in countless ways!
- Perfect Pairings: Serve it in a classic pie with a flaky crust, alongside scoops of vanilla ice cream, or even graciously drizzled over pancakes and waffles for breakfast.
- Presentation Ideas: If you’re feeling crafty, create a charming pie lattice top for a rustic feel or serve it in individual parfaits layered with whipped cream and cherries.
- Occasion Recommendations: This filling shines during summer barbecues or family reunions, but it also adds a cozy vibe to winter gatherings.
Variations & Substitutions
You can easily swap out ingredients and flavor profiles:
- Different Flavor Combinations: Try adding spices like nutmeg, or for a fun twist, fold in a handful of chopped almonds for a nutty crunch.
- Dietary Adaptations: For a keto version, use a sugar alternative like erythritol, and adjust the cornstarch for thickening.
- Seasonal Variations: When cherry season is over, consider using frozen cherries or experiment with other seasonal fruits like blueberries or raspberries.
Nutrition & Storage Info
- Prep Time: 10 minutes
- Cook Time: 15 minutes
- Total Time: 25 minutes
- Yield: About 2 cups (serving size is approximately 1/2 cup)
- Estimated Calories: 150-200 calories per serving (depending on sugar used)
- Storage Instructions:
- Room temp: Not recommended
- Fridge: Up to 1 week
- Freezer: Up to 3 months
FAQ SECTION
Can I use frozen cherries instead of fresh?
- Absolutely! Just thaw them completely and drain excess liquid before cooking.
What if I don’t have cornstarch?
- You can substitute with flour, using about twice as much as cornstarch, but it may result in a slightly different texture.
Can I make this filling without sugar?
- Yes! You can use natural sweeteners like honey or agave, but you may need to adjust the liquid components in the recipe accordingly.
How do I know when the filling is done?
- It should start to bubble vigorously and be visibly thicker. This usually takes about 5-7 minutes.
Is it safe to freeze pie filling?
- Definitely! Just make sure to cool it completely and store it in airtight containers.
Can I can this filling for long-term storage?
- Yes, following proper canning procedures can allow you to preserve it for up to a year.
What types of pies can I use this filling in?
- This filling is perfect for traditional cherry pies, cobblers, or even as a topping for cheesecakes!
Can I use this filling for something other than pies?
- For sure! Use it in tarts, over ice cream, or even blended into smoothies for a tasty twist.
How do I prevent the filling from being too runny?
- Ensure to cook it long enough for the sugar to dissolve and the cornstarch to activate. You can always add more cornstarch if needed.
Can I add spices to my cherry filling?
- Yes! Cinnamon, nutmeg, or almond extract can enhance the flavor profile, so feel free to experiment!
Conclusion
Crafting your own Homemade Cherry Pie Filling is not just about creating a delicious dessert; it’s about weaving memories and bringing warmth into your home. Whether you’re reminiscing about family gatherings or creating new traditions with loved ones, this recipe will surely become a cherished part of your baking repertoire.
I highly encourage you to give it a try, and as you do, I’d love to hear how it turns out for you! Share your feedback in the comments or tag me on social media. For more delightful cherry-inspired recipes and other baking wonders, don’t forget to check out my blog!
Deliciously Moist Carrot Muffins: A Cozy Bite of Happiness