As a passionate home baker, I can genuinely say that there are few desserts as satisfying as a good old Chocolate Peanut Butter Bar. Picture this: a lazy Sunday afternoon, the sweet scent of melted chocolate wafting through the air, and the voice of my grandmother in my ear, reminding me to always use the best quality peanut butter. It’s those moments, rooted in family tradition, that make these Chocolate Peanut Butter Bars not just a recipe, but a cherished memory.
These bars are special because they perfectly blend rich, creamy peanut butter with luscious dark chocolate, creating a symphony of flavors and textures that dance on your palate. Unlike many other recipes out there that often require an oven, this no-bake wonder allows you to whip up a delicious dessert with minimal fuss, making it a go-to for last-minute gatherings or a sweet treat after a long day.
My Chocolate Peanut Butter Bars promise a combination of nostalgia, comfort, and decadent indulgence, perfect for sharing with loved ones or savoring on your own! Buckle up, dear reader, as we embark on a delightful journey to recreate this family favorite together.
What Are Chocolate Peanut Butter Bars?
Chocolate Peanut Butter Bars are a no-bake dessert that combines the nutty richness of peanut butter with the deep, satisfying flavor of chocolate. Originating from American kitchens, these bars have gained immense popularity for their simplicity, versatility, and the sheer joy they bring to anyone lucky enough to indulge.
The taste and texture of these bars are truly delightful. The creamy peanut butter filling is slightly chewy and rich, while the topping of smooth dark chocolate provides a satisfying contrast, both in flavor and consistency. What makes them unique is their ability to cater to countless variations—making them suitable for every taste preference!
Perfect for dessert tables, picnics, or even a late-night snack, Chocolate Peanut Butter Bars are the answer to any sweet craving. They are a wonderful treat to whip up for birthdays, potlucks, or simply to enjoy during a cozy movie night at home.
Why You’ll Love This Recipe
Easy Preparation: Unlike traditional baked desserts, these Chocolate Peanut Butter Bars require no baking—just a few mixing and chilling steps, making them a perfect recipe for beginner bakers! You’ll have them ready in under 30 minutes (plus chilling time).
Customization Galore: Want to switch things up? You can easily substitute toppings, blend in your favorite nuts, or add a sprinkle of sea salt on top for that sweet-salty vibe everyone loves.
Cost-Effective: Making these at home is often more economical than buying store-bought bars, and you can use high-quality ingredients without breaking the bank.
Impressive Outcome: Each time I serve these bars, I get raving reviews! They not only taste fantastic, but they also look elegant and decadent, making them a hit at any gathering.
Delicious Yet Better for You: Packed with wholesome ingredients, these bars can be made dairy-free and refined sugar-free, giving you that sweet satisfaction without the guilt.
With your apron on, let’s dive into what you need for these luscious Chocolate Peanut Butter Bars!
{image_template}
Ingredients Section
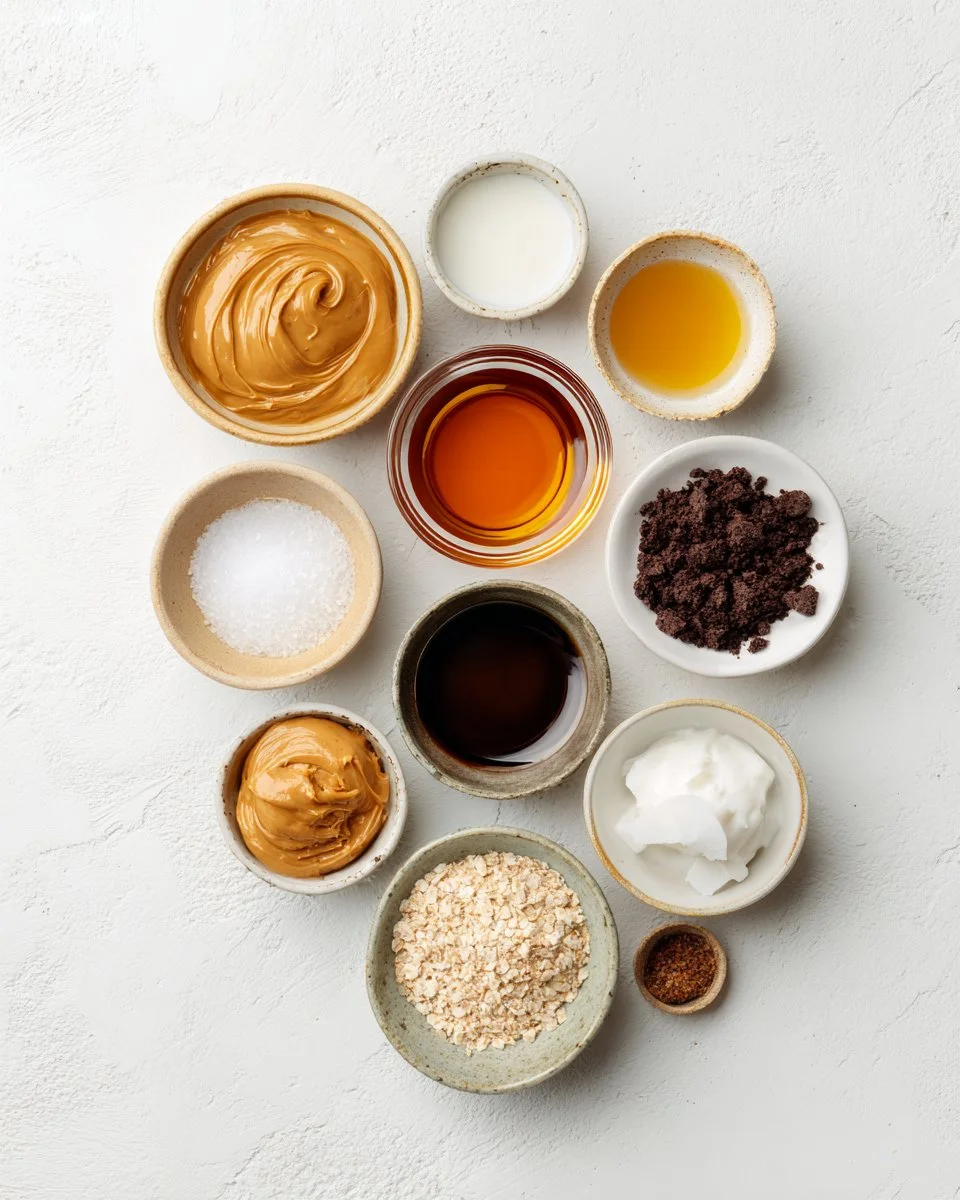
- 200 grams natural peanut butter (smooth): A high-quality peanut butter enhances flavor; I recommend brands like MaraNatha or Justin’s. Make sure it’s room temperature for easier mixing.
- 50 ml maple syrup: Use pure grade A maple syrup for the best sweetness and flavor.
- 1 tablespoon non-dairy milk: Almond or oat milk works great; just make sure it’s unsweetened.
- 3 tablespoons coconut oil (melted and cooled to room temperature): This ingredient adds creaminess. I prefer refined coconut oil for a neutral flavor.
- 1 teaspoon vanilla extract: Opt for pure vanilla extract to elevate the taste.
- 1/2 teaspoon sea salt to taste: A touch of salt enhances the sweetness.
- 150 grams digestive biscuits or graham crackers: Crush these for a delightful crust. If gluten-free is a must, seek out gluten-free alternatives.
- 100 grams dark chocolate (finely chopped): Go for at least 70% cacao for a rich flavor, and my favorite is Ghirardelli.
- 1 tablespoon natural peanut butter: It’s all about that luscious layer!
- 1 teaspoon coconut oil: To melt with chocolate for a glossy finish.
While the base recipe is easy to follow, choosing high-quality ingredients makes a significant difference in the overall flavor and texture of your bars.
Step-by-Step Instructions
Prepare the Tin: Line a loaf tin with parchment paper, allowing for extra hanging over the edges—this will help with easy removal later.
Mix the Base: In a mixing bowl, whisk together 200 grams natural peanut butter, 50 ml maple syrup, 1 tablespoon non-dairy milk, 3 tablespoons melted coconut oil, 1 teaspoon vanilla extract, and 1/2 teaspoon salt until the mixture thickens and becomes smooth (about 2-3 minutes).
Prepare the Biscuit Mixture: Crush 150 grams digestive biscuits or graham crackers into fine crumbs. You can place them in a zip-lock bag and crush with a rolling pin for minimal mess! Mix the crumbs into the peanut butter mixture until fully combined.
Create the Layer: Transfer the mixture into the lined loaf tin, pressing it down evenly with a spatula to ensure it’s compact. It’s essential to pack it tightly for clean slicing!
Chill Until Set: Place the tin in the freezer for about 30 minutes or refrigerate for 4 hours until it is firm. This waiting game is critical, so try to resist temptation during this time!
Melt the Topping: In a bain-marie, melt together 100 grams finely chopped dark chocolate, 1 tablespoon natural peanut butter, and 1 teaspoon coconut oil. Stir until smooth and shiny, which should take around 5 minutes.
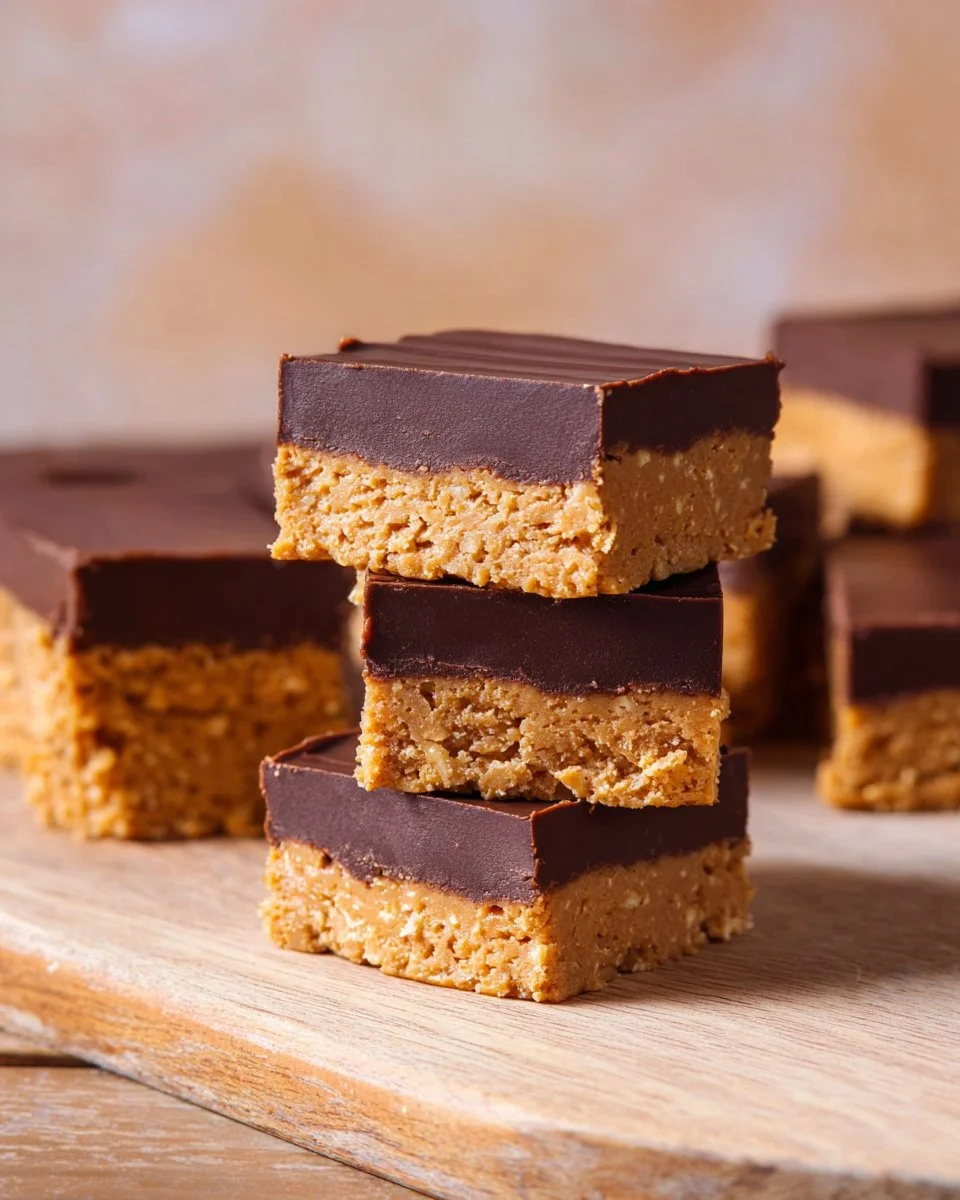
Finish the Bars: Once your peanut butter base has chilled, pour the melted chocolate mixture over the top. Spread it evenly and return it to the fridge for another 20 minutes to set.
Slice and Store: Carefully lift the bars from the tin using the parchment paper. Turn them onto a cutting board and slice into squares. Store in a sealed container in the fridge for up to a week (if they last that long!).
Chef’s Tip: If you find the chocolate topping is too thick, add a splash more coconut oil while melting to achieve a glossy finish.
Once you nail this recipe, the next step is to explore the delicious possibilities waiting for you!
Expert Tips & Tricks
Quality Matters: Using high-quality peanut butter and chocolate can elevate these bars to a whole new level. Always pick brands that use natural ingredients.
Storage Recommendations: Keep the bars in an airtight container in the fridge to maintain their freshness. You can also freeze them for up to three months; just be sure to thaw them overnight in the refrigerator before enjoying.
Make-Ahead Instructions: These bars are perfect for meal prepping; make a batch in advance to satisfy your sweet cravings throughout the week!
Troubleshooting: If your mixture isn’t setting well, make sure you’re using enough coconut oil and that the mixture is tightly packed in the tin.
Custom Flavor Combos: For a flair of variety, try adding shredded coconut, or a sprinkle of crushed nuts on top before chilling!
Serving Suggestions: Serve the bars with a dollop of whipped coconut cream or alongside fresh fruit like strawberries or bananas!
Serving Suggestions
One of the best things about Chocolate Peanut Butter Bars is their versatility! Serve them as a delightful after-school snack for kids, a sweet dessert for gatherings, or even a post-dinner treat alongside a steaming cup of herbal tea or coffee.
For an elegant presentation, slice the bars into smaller squares and arrange them on a beautiful platter with fresh fruits or a sprinkle of chopped nuts. You could even add a drizzle of extra melted chocolate or a dusting of cocoa powder on top for a fancy finish.
Variations & Substitutions
Additional Flavors: Experiment with adding spices, such as cinnamon or a touch of cayenne for heat. You could also swirl in some raspberry or strawberry jam for a fruity twist!
Dietary Adjustments: To make these Gluten-Free, opt for gluten-free graham crackers or sweet rice flour and use certified gluten-free oats as an alternative.
Seasonal Variations: Around the holidays, mix in festive spices—think gingerbread or pumpkin spice for a seasonal twist. These bars can easily be adapted for any holiday gathering.
Nutrition & Storage Info
- Prep Time: 10 minutes
- Chill Time: 30 minutes to 4 hours (based on preferred setting)
- Total Time: 40 minutes plus chill time
- Yield: 8 servings
- Estimated Calories per Serving: Approximately 250 calories (varies based on specific ingredients)
- Storage Instructions: Best kept in the fridge, consumed within a week. Freeze for up to 3 months!
FAQ Section
Can I substitute peanut butter with almond butter?
Yes! Almond butter or cashew butter works beautifully, just be aware that the flavor will change slightly.How can I make these bars vegan?
Simply use a plant-based chocolate option, and ensure that the peanut butter is vegan-friendly.What dark chocolate should I use?
Go for at least 70% cacao for rich flavor. Brands like Ghirardelli are excellent!What should I do if my bars are too crumbly?
Ensure you’re using enough coconut oil and packing the mixture tightly into the tin.Can I add protein powder?
Absolutely, just replace a small portion of the peanut butter with your favorite protein powder for a healthier snack option.What other toppings can I use?
Feel free to experiment with crushed nuts, seeds, or even a sprinkle of flaky sea salt!Are these bars gluten-free?
Yes, if you use gluten-free digestive biscuits or graham crackers.How long do these bars stay fresh?
They last about a week in the refrigerator and can be frozen for up to three months!Can I make these with kids?
Definitely! It’s a fun and easy recipe to include children in the kitchen; just supervise during any melting steps.What kitchen tools do I need?
All you need is a mixing bowl, measuring cups, a spatula, and a loaf tin.
Conclusion
These Chocolate Peanut Butter Bars are more than just a treat; they’re an experience filled with warmth and nostalgia. The perfect blend of flavors and textures will surely create smiles and sweet memories for everyone in your family.
So why not give this delightful recipe a try? I promise you won’t regret it! If you do, let me know your thoughts and any twists you added to make it your own. And if you loved these bars, explore my other recipes on the blog for more simple and scrumptious treats!
Irresistible Crock Pot Chicken Pot Pie: The Ultimate Comfort Food!
Happy baking!

Chocolate Peanut Butter Bars
Ingredients
Method
- Line a loaf tin with parchment paper, allowing extra hanging over the edges for easy removal.
- In a mixing bowl, whisk together the peanut butter, maple syrup, non-dairy milk, melted coconut oil, vanilla extract, and sea salt until smooth (about 2-3 minutes).
- Crush the digestive biscuits or graham crackers into fine crumbs and mix them into the peanut butter mixture until fully combined.
- Transfer the mixture into the lined tin, press down evenly to ensure it’s compact, and chill in the freezer for about 30 minutes or refrigerate for 4 hours until firm.
- Melt the dark chocolate, natural peanut butter, and coconut oil together in a bain-marie until smooth and shiny.
- Once the base is firm, pour the melted chocolate mixture over it and spread evenly. Return to the fridge for another 20 minutes to set.
- Lift the bars from the tin using the parchment paper, slice into squares, and store in a sealed container in the fridge for up to a week.