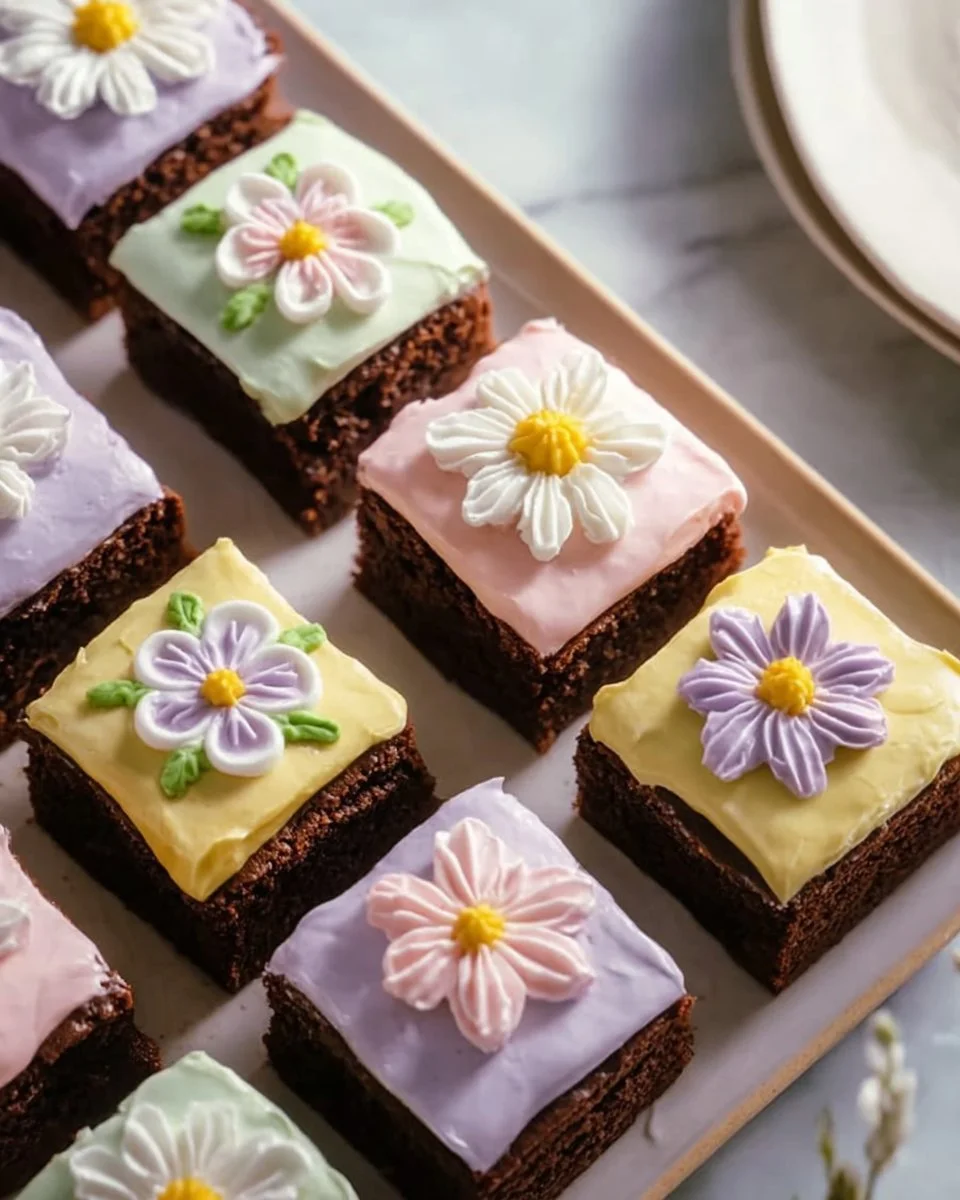
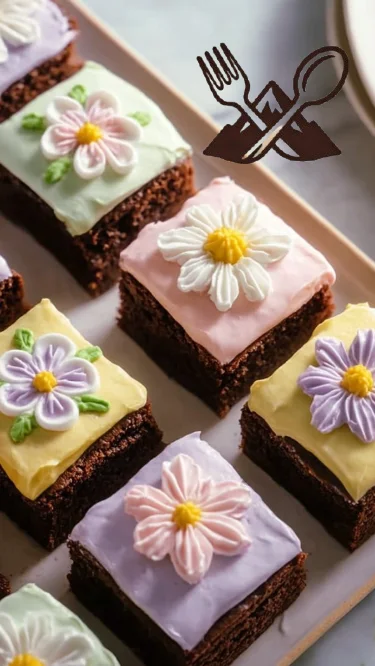
As the first blossoms of spring emerge, so do my cravings for something sweet and colorful! I have fond memories of spring afternoons spent in the kitchen with my mom, whipping up batches of brownies. The rich chocolate aroma mingling with the scent of blooming flowers always felt like a celebration of the season. This year, I’m putting a delightful spin on that classic recipe with my Spring Brownies, a vibrant treat decorated with pastel candies that scream warmth and joy.
What sets these brownies apart? It’s not just the rich, fudgy texture or the burst of chocolate flavor; it’s that cheerful, festive topping that takes them to the next level. While traditional brownies are undoubtedly comforting, my spring version adds a splash of color and whimsy—perfect for sharing at picnics, parties, or just as a special family dessert.
In this post, I promise you’ll learn how to create these gorgeous Spring Brownies, from the ingredients to the delightful finishing touches. Let’s bring a little sunshine to your baking today!
What Are Spring Brownies?
The origin of brownies is fascinating, dating back to the early 20th century. They were initially introduced as a cross between a cake and a cookie, resulting in a fudgy treat that has captured hearts (and stomachs) ever since. Spring Brownies take that beloved foundation and elevate it!
These vibrant brownie bars boast a rich chocolate flavor fused with a soft, gooey interior that melts in your mouth, while the topping of pastel candies adds a fun crunch and a pop of color. They’re perfect for any spring celebration—from Easter brunch to garden parties—or even just as a delightful treat for your family (because why not?).
Why You’ll Love This Recipe
Wholesome Ingredients: With just a handful of pantry staples—like butter, sugar, and cocoa powder—you can create a delicious homemade treat. These ingredients are often fresher and tastier than store-bought options.
Cost-Effective: Why spend a fortune on premium brownies from a bakery when you can whip up a batch at home for a fraction of the cost? Plus, making brownies yourself means you can indulge without breaking the bank!
Customization Options: Feel free to personalize your Spring Brownies! Toss in some walnuts or chocolate chips, try different pastel candies, or even drizzle a bit of homemade caramel on top. The options are endless.
Easy to Make: If you’re worried about baking skills, have no fear! This is an easy recipe that even beginner bakers can tackle with confidence. It requires minimal equipment and about 10 simple steps from start to finish.
Perfect for Sharing: These brownies are visually stunning and delicious, making them an excellent choice for gatherings. Their cheerful appearance is sure to evoke smiles among friends and family!
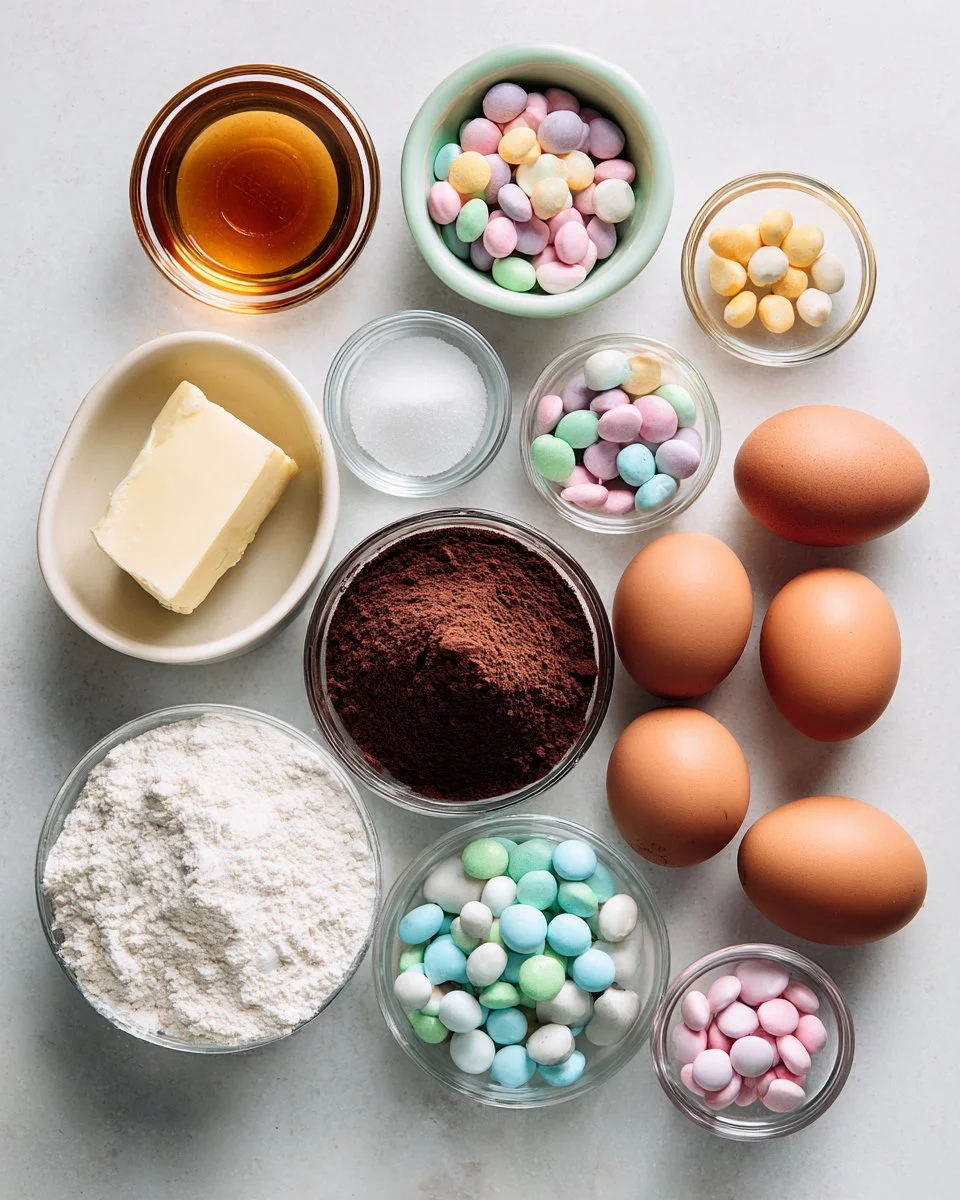
Ingredients
- 1 cup unsalted butter (softened to room temperature for easy mixing)
- 2 cups granulated sugar (adds sweetness and moisture)
- 4 large eggs (room temperature helps emulsify the batter)
- 1 teaspoon vanilla extract (for that aromatic richness)
- 1 cup all-purpose flour (acts as the structure)
- 1 cup unsweetened cocoa powder (rich chocolate flavor, I recommend Hershey’s)
- 1/2 teaspoon salt (to balance sweetness)
- 1/2 teaspoon baking powder (for that perfect rise)
- Pastel candies for topping (mini eggs are perfect for spring!)
- Frosting for decorating (store-bought or homemade, your choice!)
Notes: Choose high-quality ingredients, especially the cocoa powder—trust me, it makes a difference! For a lighter variation, consider using unsweetened applesauce in place of half the butter.
Step-by-Step Instructions
Preheat your oven to 350°F (175°C). Grease and line a 9×13-inch baking pan with parchment paper for easy removal.
Melt the butter in a microwave-safe bowl or over low heat on the stove. Once melted, let it cool slightly. Combine it with the sugar in a large mixing bowl and mix until well combined and smooth—a good 2 minutes of stirring!
Add the eggs, one at a time, mixing well after each addition to ensure they’re fully incorporated. Then, stir in the vanilla extract for that lovely aroma.
In another bowl, whisk together the flour, cocoa powder, salt, and baking powder.
Gradually add the dry ingredients to the wet mixture, stirring gently until the batter is just combined. Avoid over-mixing to keep them fudgy!
Pour the batter into the prepared baking pan, spreading it evenly with a spatula.
Bake for 25-30 minutes or until a toothpick inserted in the center comes out clean or with a few moist crumbs attached (not wet batter!).
Allow the brownies to cool completely in the pan on a wire rack. Patience is key—this will make them easier to cut later!
Once completely cooled, top with playful swirls of frosting to add color, followed by a sprinkle of pastel candies to give it that cheerful spring vibe.
Cut into squares, serve, and enjoy your vibrant Spring Brownies—your family won’t be able to resist!
Chef’s Tip: Take care not to overbake; your brownies should be firm on the edges but still soft in the center.
Expert Tips & Tricks
Storage: Store your brownies in an airtight container at room temperature for up to 3 days or in the refrigerator for up to a week. If you need them to last longer, they can be frozen for up to three months.
Make-Ahead: You can prepare the brownie batter a day in advance. Just refrigerate it overnight and bake the next day.
Troubleshooting: If your brownies come out too cake-like, reduce the baking time slightly next time. For extra fudgy brownies, consider adding a touch more butter or chocolate.
Frosting Options: Try a cream cheese frosting for a tangy twist or a whipped chocolate ganache for extra richness!
Perfect Brownie Tips: For that chewy texture, allow the batter to sit for 20 minutes before baking to let the gluten relax!
Serving Suggestions
Pair your Spring Brownies with a dollop of whipped cream or a scoop of vanilla ice cream for a delightful contrast in texture. For fancy occasions, serve them on a decorative plate and drizzle with extra frosting or chocolate sauce. These brownies are perfect for spring gatherings, picnics, or simply as a treat for the family.
Variations & Substitutions
Flavors: For a playful twist, infuse the batter with almond extract or add a handful of mini chocolate chips or peanut butter chips.
Dietary Needs: Want a gluten-free version? Swap out the all-purpose flour for a 1:1 gluten-free flour blend.
Seasonal Options: In the fall, you can make pumpkin brownies by replacing half of the butter with pumpkin puree and adding a sprinkle of pumpkin spice!
Nutrition & Storage Info
- Prep Time: 15 minutes
- Cook Time: 30 minutes
- Total Time: 45 minutes
- Yield: About 24 brownies (depending on the size you cut)
- Estimated Calories per Serving: 200 calories
Storage: Keep brownies at room temperature for 3 days, or refrigerate for a week. Freeze them in an airtight container for up to 3 months.
FAQ Section
Can I use salted butter instead of unsalted?
Yes! Just reduce the added salt in the recipe by half.Can I substitute cocoa powder with melted chocolate?
Absolutely! Use around 2 ounces of melted chocolate for every 1/3 cup of cocoa powder, adjusting for sweetness.What can I use instead of eggs for a vegan version?
Replace each egg with 1/4 cup of unsweetened applesauce or 1 tablespoon of ground flaxseed mixed with 2.5 tablespoons of water (let it sit for a few minutes to thicken).Why did my brownies turn out cakey?
This could be due to overmixing or overbaking. Keep an eye on your brownies while they’re baking!How can I tell if they’re done baking?
Use a toothpick; if it comes out with a few moist crumbs but not wet batter, they’re perfect.Can I make these in advance?
Yes! You can make the batter a day in advance and refrigerate it until you’re ready to bake.What’s the best way to cut brownies neatly?
Use a sharp knife and wipe it clean between cuts to keep them looking perfect!How do I store brownie leftovers?
Store them in an airtight container at room temperature or refrigerate to extend their freshness!Can I freeze brownies?
Yes! Just wrap them tightly in plastic, then in foil, and store in a freezer-safe container for up to 3 months.What toppings do you recommend?
Get creative! Fresh berries, drizzled melted chocolate, or even a sprinkle of sea salt can elevate your brownies.
Conclusion
These Spring Brownies are more than just a delightful treat; they’re a celebration of family, memories, and the joyous arrival of spring! With their beautiful colors and irresistible taste, they’re sure to become a favorite. I encourage you to give this recipe a try—your taste buds will thank you!
Don’t forget to leave a comment below to share your thoughts, and check out my other spring-inspired recipes on the blog.
Irresistible Banana Cream Cheese Cookies: A Sweet Twist on a Classic
Happy baking!