Table of Contents
Table of Contents
Have you ever felt the magic of freshly fallen snow? I remember the excitement every winter when snow blanketed our backyard, turning it into a winter wonderland. As kids, my siblings and I would rush outside, our cheeks rosy, to catch snowflakes on our tongues and have snowball fights. But do you remember that one splendid moment when we discovered we could turn that fluffy snow into a sweet, creamy treat? That’s right; I’m talking about Viral Snow Ice Cream!
What makes this homemade snow ice cream so enchanting is not only its dreamy, creamy texture but also the way it captures that playful spirit of winter. Unlike store-bought ice creams filled with preservatives, this recipe allows you to create a fresh, delightful dessert with just a few simple ingredients. It’s easy, fun, and brings the family together for a moment of delicious joy.
I hope you’ll join me on this exciting journey of creating your very own Viral Snow Ice Cream in the kitchen. You’ll learn how to whip up this wintry delight, personalization options, and even some tips to make it a family tradition. Trust me, you’ll want to keep this recipe handy for every snowfall!
What Are Viral Snow Ice Cream?
Viral Snow Ice Cream, as the name suggests, is a delightful concoction made using fresh, clean snow. This delightful treat first gained attention on social media, as people discovered how easy and fun it is to make. Traditionally, it’s made by mixing snow with a few simple ingredients like whipping cream, vanilla, and powdered sugar.
The taste? Imagine soft, creamy clouds of vanilla sweetness melting in your mouth with a hint of that unique icy crunch, which only fresh snow can bring. It’s sweet but not overwhelmingly so and has a texture that’s both creamy and fluffy. It’s a treat that embodies the spirit of winter, bringing back fond family memories and cozy moments.
So when the snow starts to fall, don’t miss the opportunity to create this fun dessert. It’s perfect for those snowy afternoons when the whole family gathers, laughter fills the air, and fresh snow calls for something extraordinary!

Why You’ll Love This Recipe
Simplicity & Ease: This recipe is incredibly easy to make. With minimal ingredients and steps required, it’s perfect for beginner cooks. You won’t need any fancy equipment, just a bowl and a spoon!
Cost-Effective: I bet you spend a pretty penny on store-bought ice cream, especially those gourmet flavors. With Viral Snow Ice Cream, you can whip up deliciousness for a fraction of the cost. A small container of whipping cream, some powdered sugar, and snow — that’s all you need!
Customization Galore: One of the best parts? You can customize your snow ice cream to your heart’s content! Want a chocolate twist? Just add cocoa powder! Feeling fruity? Toss in pureed berries or even a splash of fruit extract! The choices are endless.
High-Quality Ingredients: Unlike store-bought ice creams that are often loaded with preservatives, you control the quality of ingredients used. Here, you can source organic, high-quality cream and adjust sweetness to your preference.
Quick Pleasure: From start to finish, you can have this delicious treat ready in just a few minutes. Whether it’s a spontaneous activity after a snowstorm or a planned winter gathering, it won’t take much time at all!
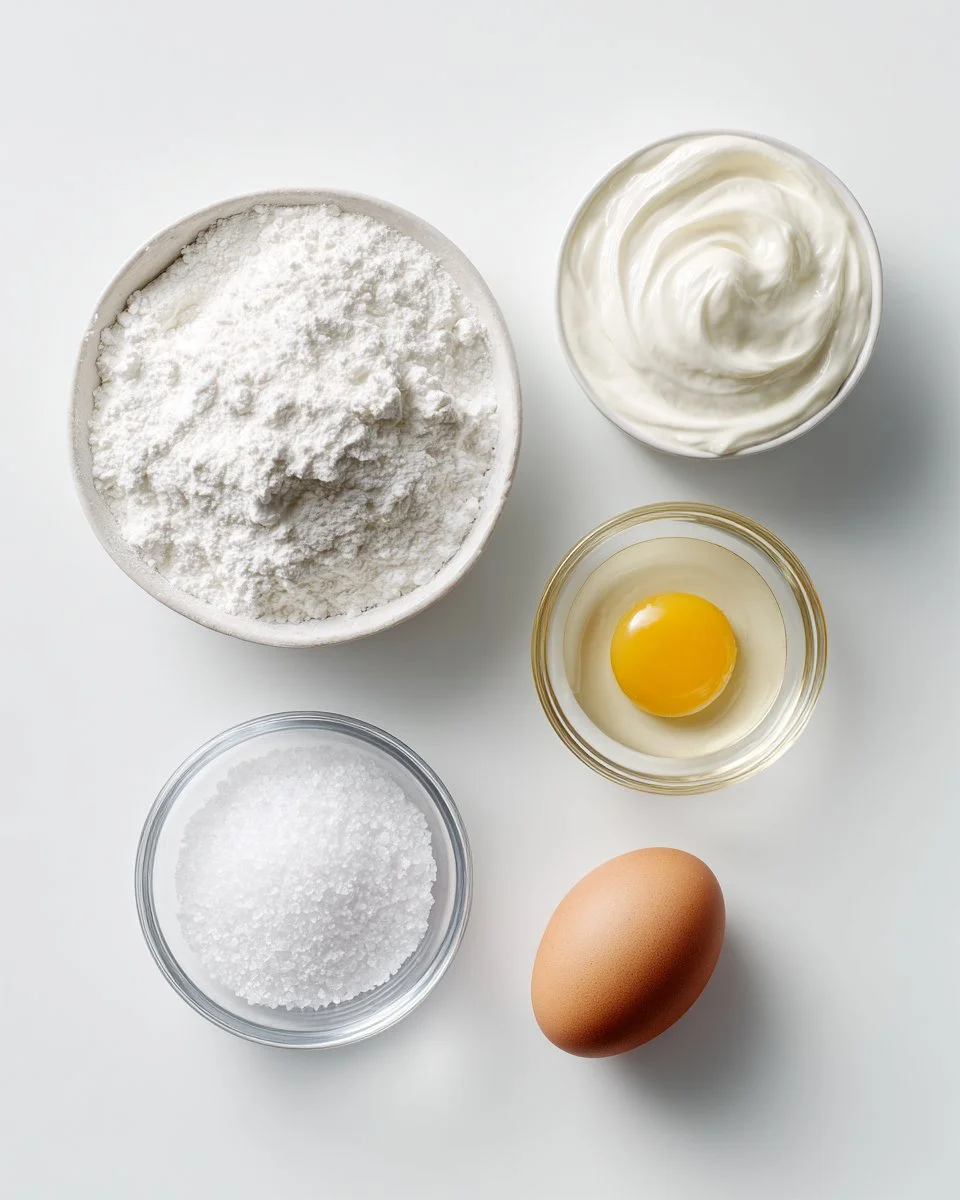
Ingredients Section
- 1 small container whipping cream (35 percent): For that rich, creamy base. Look for organic brands if possible for a fresher taste.
- 1 teaspoon vanilla: Adds that comforting warmth. Feel free to adjust to your taste or explore flavored extracts!
- 1/2 cup powdered sugar: Essential for sweetness — adjust according to your sweet tooth!
- Salt: A few pinches to enhance flavor; avoid table salt if you can — kosher or sea salt works beautifully.
Prep Notes: Ensure the whipping cream is well-chilled for optimal results.
Step-By-Step Instructions
Gather Your Ingredients: On a cheerful snowy day, gather your whipping cream, vanilla, powdered sugar, and a generous amount of snow!
Prepare the Snow Base: Create a well in the fresh snow using your bowl. This is where the magic will happen!
Add Salt: Sprinkle a good amount of salt into the well. This will help stabilize the mixture and enhance flavors. (Chef’s Tip: Don’t overdo it; a few tablespoons should suffice!)
Mix It Up: Pour the cold whipping cream, add the vanilla, and sprinkle in the powdered sugar. With a spoon, gently mix everything until it begins to solidify.
Timing: This usually takes about 2-4 minutes; keep mixing until you reach a creamy consistency. The snow should help it fluff up.
Enjoy: Once you’ve achieved the desired texture, scoop it out, and enjoy immediately! (Chef’s Tip: Serve it in pretty bowls for a delightful presentation!)
Common Mistakes to Avoid: If it turns too runny, use less snow next time or add a bit more powdered sugar for thickening!
Expert Tips & Tricks
- Quality Over Quantity: Always aim for the freshest snow—avoid using snow that’s dirty or has been out for too long!
- Storage: If you have leftovers, store it in an airtight container in the freezer. However, it’s best enjoyed fresh.
- Make-Ahead Instructions: While this is best made right away, you can have all your ingredients pre-measured for a quick assembly when the snow falls.
- Troubleshooting: If your ice cream turns out too runny, you may have added too much snow. You can always balance it by mixing in a bit more cream or powdered sugar.
Serving Suggestions
Pair your delightful Viral Snow Ice Cream with a slice of warm pie or enjoy it alongside hot cocoa on a chilly night. For a festive twist, top your ice cream with shredded coconut, chocolate syrup, or festive sprinkles. Perfect for holiday gatherings or cozy movie nights!
Variations & Substitutions
- Flavor Combinations: How about a minty twist? Add some peppermint extract for a winter wonderland experience! Or go tropical with coconut cream and shredded coconut.
- Dietary Adaptations: For a dairy-free version, consider using coconut cream instead of heavy whipping cream.
- Seasonal Variations: In the summer, use crushed ice instead of snow for a refreshing icy treat!
Nutrition & Storage Info
- Prep Time: 5 minutes
- Total Time: 10 minutes (includes mixing)
- Yield: Approximately 4 servings
- Estimated Calories per Serving: 150 calories, depending on the ingredients used.
- Storage Instructions: Best served fresh but can be stored in the freezer for up to 1-2 days.
FAQ Section
Can I use snow that’s been on the ground for a while?
- It’s best to use freshly fallen snow. Avoid snow that’s discolored or has been sitting too long to ensure a clean taste.
Can you make snow ice cream without whipping cream?
- You can try heavy cream, but it may not hold the same luscious texture.
What if I don’t have powdered sugar?
- Granulated sugar can be used, but it won’t dissolve as well. Just mix longer to get a smoother consistency.
How do I make it more flavorful?
- Consider adding nutmeg, cinnamon, or even flavored extracts for a unique twist.
Can kids help with this recipe?
- Absolutely! This is a fun family activity perfect for kids, and they’ll love getting involved in the mix!
What happens if it’s not snowing? Can I make a similar recipe with ice?
- Yes, crush some ice and use that instead. The results will taste different, but still delightful!
Is it safe to eat snow?
- As long as the snow is fresh, clean, and not contaminated, it’s safe to eat. Always use caution.
Can I make snow ice cream in advance?
- While it’s best enjoyed fresh, you can prepare all ingredients in advance and mix them when you’re ready to serve.
Why does my ice cream melt quickly?
- If it melts rapidly, you may have used too much snow or the snow was too warm. Adjust for next time!
How can I make it a richer dessert?
- Adding more cream or even a dollop of condensed milk can enrich the flavors and texture!
Conclusion
Viral Snow Ice Cream is not just another recipe; it’s an experience that captures the essence of winter magic and childhood wonder. With its delightful simplicity and endless possibilities for customization, it’s a treat worth trying this snowy season. I encourage you to make it with your family and create new memories to cherish for years to come!
Don’t forget to drop your feedback and let me know how your ice cream turns out. You might also enjoy checking out my other winter recipes, like Hot Cocoa Fudge or
Irresistibly Creamy Fudgesicle Recipe, right here on my blog! Happy snow day!

Viral Snow Ice Cream
Ingredients
Method
- Gather your ingredients: On a cheerful snowy day, gather your whipping cream, vanilla, powdered sugar, and a generous amount of snow.
- Prepare the snow base: Create a well in the fresh snow using your bowl.
- Add salt: Sprinkle a good amount of salt into the well to stabilize the mixture.
- Mix it up: Pour the cold whipping cream, add the vanilla, and sprinkle in the powdered sugar, gently mixing until it begins to solidify (2-4 minutes).
- Enjoy: Once you’ve achieved the desired texture, scoop it out and enjoy immediately in pretty bowls.