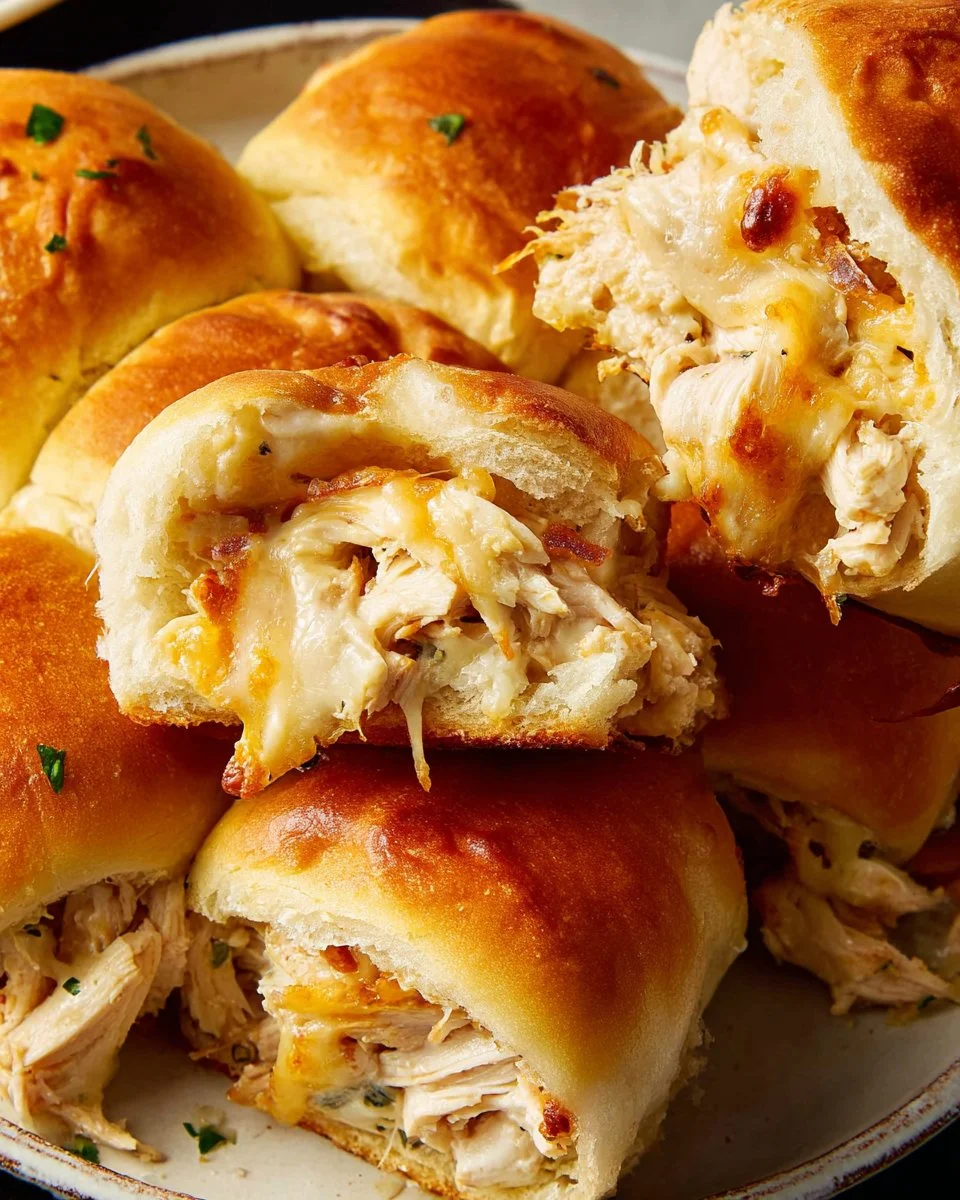
Have you ever found yourself gathering around the kitchen island with friends and family, the smell of something delicious wafting through the air? That aroma is more than just a prelude to a meal; it’s an invitation to create memories. My heart always warms at the thought of Chicken Bacon Ranch Sliders, those cheesy, savory bites layered with crispy bacon and zingy ranch dressing. Trust me when I say, this recipe is a keeper.
Growing up, sliders were a staple at family get-togethers, but none ever compared to the chicken bacon ranch version. My mom would whip up a batch that disappeared before you could say “seconds, please!” What makes this recipe stand out is the combination of tender rotisserie chicken, fresh herbs, and bubbling cheese pushed between soft, sweet slider buns. It’s like a hug in sandwich form, guaranteed to make any gathering feel special.
With this easy recipe, I promise you’ll learn not just how to assemble these sliders, but also how to elevate them with flavors that bring people together. So, roll up your sleeves, and let’s dive into creating the ultimate comfort food!
What Are Chicken Bacon Ranch Sliders?
Chicken Bacon Ranch Sliders are the perfect fusion of flavors, textures, and comfort—all crammed into small, delicious buns. Originating from the classic combination of chicken, bacon, and ranch dressing, these sliders first gained popularity in potluck dinners and game day feasts. Their appeal lies not only in their taste but also in their playful bite-sized nature, making them ideal for both casual gatherings and elegant parties.
Each slider features a perfectly baked bun with a filling that’s creamy, crunchy, and oh-so-satisfying. The rotisserie chicken offers a savory, tender base, while the bacon adds a smoky crunch, and ranch dressing contributes a tangy creaminess that you can’t resist. When baked, these delights turn golden brown, and the cheese melts into a gooey layer of happiness. They’re the ideal choice for any occasion, whether you’re hosting a game day party, celebrating a birthday, or just wanting a comforting weeknight dish.
Why You’ll Love This Recipe
An Explosion of Flavor: Each bite is a delightful combination of savory chicken, crispy bacon, and zesty ranch dressing. This satisfying flavor explosion is often missing in store-bought versions.
Cost-Effective and Time-Saving: Made with rotisserie chicken and simple ingredients, these sliders are not only budget-friendly but also quick to prepare. You’ll spend less time cooking and more time enjoying with loved ones.
Highly Customizable: Want to spice it up? Add jalapeños or swap in a different cheese. Prefer a lighter version? Substitute grilled chicken breast and Greek yogurt ranch. These sliders can adapt to your taste and dietary needs!
Ease of Preparation: If you can slice bread, you can master this recipe! It’s simple enough for novice cooks, while also giving seasoned chefs an opportunity to experiment and tweak flavors.
Perfect for Any Gathering: Whether it’s game night, a potluck, or a cozy family dinner, Chicken Bacon Ranch Sliders are always a hit. They can be served warm or at room temperature, making them versatile and easy to share.
Ingredients
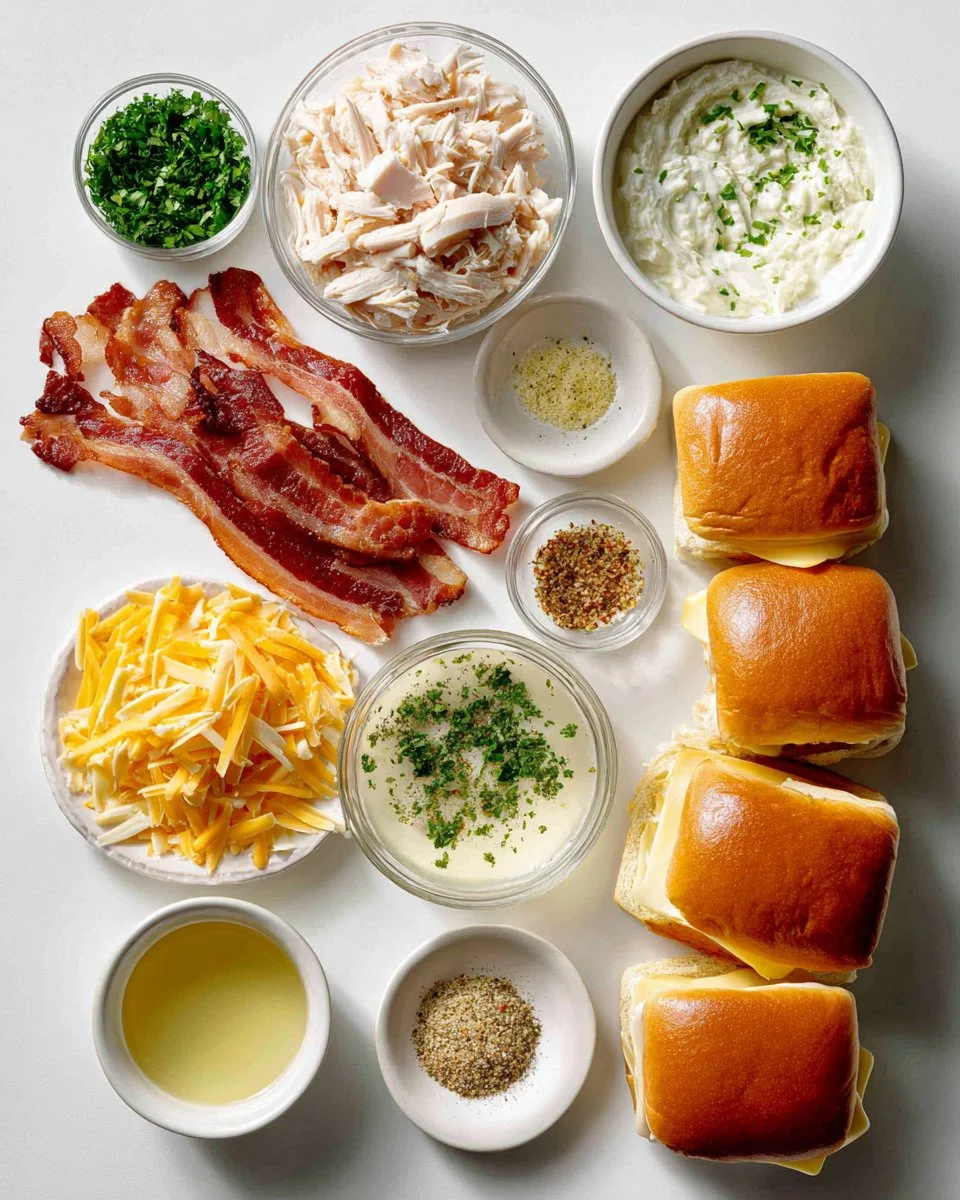
For these mouthwatering Chicken Bacon Ranch Sliders, you will need:
- 8 strips of bacon: Use thick-cut bacon for a better texture.
- 3 cups of shredded rotisserie chicken: Warmed up for optimal flavor.
- ¾ cup of Ranch dressing: More can be added for extra creaminess.
- 1 teaspoon of garlic powder: Fresh minced garlic works too!
- 2 tablespoons of chopped fresh Italian parsley: For a pop of freshness.
- Salt and pepper to taste.
- 1 package (12-count) slider buns: I recommend King’s Hawaiian for their sweetness.
- 12 slices of Colby Jack cheese: It melts beautifully and complements the flavors well.
- 4 tablespoons of warm melted butter: To brush on top for added richness.
- ½ teaspoon of garlic powder (additional for the butter).
- ½ teaspoon of finely chopped parsley (or ½ teaspoon of dried Italian seasoning).
Prep Notes: Make sure your butter is at room temperature for easy brushing and slicing the buns is easier with a serrated knife.
Step-by-Step Instructions
1. Preheat the Oven
Preheat your oven to 350°F. Line a 9×13 inch baking dish with parchment paper for easy cleanup.
2. Cook and Dice Bacon
In a skillet over medium heat, cook the bacon until crispy, about 5-7 minutes. Once cooked, transfer to a plate lined with paper towels to drain and cool slightly. Dice into small pieces and set aside.
3. Prepare the Chicken Filling
In a large bowl, combine the shredded rotisserie chicken, Ranch dressing, garlic powder, and 2 tablespoons chopped parsley. Stir until evenly coated, seasoning with salt and pepper to taste. If you desire a creamier filling, add more Ranch dressing.
4. Assemble Sliders
Using a serrated knife, slice the slider buns in half horizontally without separating them. Place the bottom half in the prepared baking dish. Spread a layer of Ranch dressing over the base. Next, layer on 6 slices of cheese, the creamy chicken mixture, and diced bacon. Top with the remaining 6 slices of cheese. Brush the cut side of the top rolls with more Ranch dressing and place them back on top.
5. Brush with Melting Garlic Butter
In a small bowl, mix the warm melted butter, additional garlic powder, and parsley. Brush this mixture generously over the tops of the rolls, ensuring they’re well-coated.
6. Bake
Cover the baking dish with foil and bake for about 20-25 minutes, or until the cheese is melted and sliders are heated through. Remove the foil and bake for an additional 5-7 minutes, until the tops are golden and crispy.
7. Serve
Let cool for just a few minutes before slicing and serving. Trust me—you’ll want to enjoy these warm with your favorite side!
Expert Tips & Tricks
Storing Leftovers: Place any leftover sliders in an airtight container in the fridge. They can last up to 3 days. Just reheat them in the oven at 350°F until warmed through to get that fresh texture back.
Make-Ahead Option: You can prepare the filling and store it in the fridge the night before. Just assemble and bake when you’re ready to serve.
Troubleshooting: If you find the sliders too dry, consider adding additional Ranch dressing or even a drizzle of barbecue sauce for moisture and extra flavor.
Presentation Matters: After baking, sprinkle a little extra parsley on top for color. Serve them on a wooden board to create an inviting display.
Variations and Customizations: Spice things up by using pepper jack cheese or adding diced jalapeños to the filling to entice those who enjoy a little heat.
Watch for Burning: Keep an eye on the tops during the last few minutes of baking, as they can brown quickly. If they look golden and the cheese is bubbling, they’re done!
Serving Suggestions
Pair your Chicken Bacon Ranch Sliders with a refreshing side salad, crispy coleslaw, or potato wedges for a fulfilling meal. For a touch of gourmet, consider serving them alongside homemade sweet potato fries or a vibrant vegetable platter. These sliders are perfect for casual game days, summer BBQs, or cozy family dinners—and don’t forget to serve them with extra ranch on the side for dipping!
Variations & Substitutions
- Buffalo Chicken Variation: Substitute rotisserie chicken with shredded buffalo chicken for a spicy twist.
- Vegetarian Option: Swap chicken for grilled cauliflower or hearty mushrooms, topped with crispy bacon made from coconut or eggplants.
- Cheesy Spinach Dip Sliders: Incorporate cream cheese and spinach for a lighter alternative that still satisfies.
- Seasonal Touch: Incorporate autumn spices like sage or add roasted red peppers for a summer twist!
Nutrition & Storage Info
- Prep Time: 15 minutes
- Cook Time: 30 minutes
- Total Time: 45 minutes
- Yield: 12 servings
- Estimated calories per serving: Approximately 250 calories
- Storage Instructions: For room temp, don’t leave out more than two hours. Store in the fridge for up to 3 days, or freeze for up to a month (wrap individually in plastic wrap and foil).
FAQ Section
Can I freeze Chicken Bacon Ranch Sliders?
Yes! After baking, let them cool completely, then wrap them tightly and freeze. To reheat, thaw in the fridge overnight and warm in the oven.What’s the best way to reheat these sliders?
The oven is best for reheating—wrap them in foil and bake at 350°F until warmed through.Can I use homemade ranch dressing?
Absolutely! Homemade ranch can add a fresher flavor compared to store-bought.How can I make these gluten-free?
Use gluten-free slider buns and ensure the ranch dressing is certified gluten-free.Are these sliders kid-friendly?
Definitely! Kids love the cheesy, savory flavors. You can tweak the ranch dressing for milder tastes if needed.Can I use turkey instead of chicken?
Yes! Diced turkey works wonderfully in this recipe as well.What’s the best cheese to use?
Colby Jack is great for melting, but feel free to experiment with mozzarella or cheddar for different flavor profiles.What if I don’t have a 9×13 baking dish?
You can use two smaller baking dishes or even a muffin tin for mini sliders!What can I serve with these sliders?
Fresh salads, crispy chips, or a variety of dips complement sliders perfectly.Why are my sliders soggy?
This can happen if too much sauce is added. Make sure you’re not overloading the filling, and use fresh buns to avoid moisture absorption.
Conclusion
These Chicken Bacon Ranch Sliders are more than just a recipe; they’re a delightful journey of flavors that brings joy to any gathering. I encourage you to try this out the next time you have friends or family over, and watch as they disappear! I’d love to hear your thoughts and any modifications you might make to personalize this delicious recipe. Don’t forget to check out my other slider recipes for more crowd-pleasing options!
The Ultimate Comfort Food: Easy and Delicious Tuna Noodle Casserole Revolution
Happy cooking!

Chicken Bacon Ranch Sliders
Ingredients
Method
- Preheat your oven to 350°F. Line a 9×13 inch baking dish with parchment paper.
- In a skillet over medium heat, cook the bacon until crispy, about 5-7 minutes. Transfer to a plate lined with paper towels to drain and cool. Dice into small pieces.
- In a large bowl, combine the shredded chicken, Ranch dressing, garlic powder, and chopped parsley. Stir until evenly coated, seasoning with salt and pepper to taste.
- Using a serrated knife, slice the slider buns in half horizontally. Place the bottom half in the baking dish, spread a layer of Ranch dressing, followed by 6 slices of cheese, the chicken mixture, and diced bacon. Top with the remaining 6 slices of cheese.
- Brush the cut side of the top buns with more Ranch dressing and place them back on top.
- Mix warm melted butter with additional garlic powder and parsley. Brush this over the tops of the rolls.
- Cover the baking dish with foil and bake for about 20-25 minutes. Remove the foil and bake for an additional 5-7 minutes until the tops are golden and crispy.
- Let cool for a few minutes before slicing and serving.