Growing up, family dinners were sacred occasions filled with laughter, stories, and, of course, mouthwatering food. One dish that consistently graced our table was my mom’s Chicken Enchiladas—melt-in-your-mouth tortillas stuffed with savory chicken, drenched in a rich, spicy sauce, and topped with bubbly cheese. It was a spectacle of color and aroma, with each bite bringing back those cozy memories of home. When I decided to try my hand at re-creating her recipe, I wanted to capture not just the flavors but the feeling of comfort and togetherness.
These Chicken Enchiladas are not just another recipe; they are an invitation to make your kitchen a gathering place. What sets my version apart? It’s a balance of flavors that will keep you coming back for more, with creamy Greek yogurt and hearty refried beans to complement the shredded chicken. Plus, they’re incredibly versatile and easy to customize based on what you have on hand or your family’s preferences.
In this post, I’m excited to share my tested-and-true Chicken Enchiladas recipe, complete with step-by-step instructions, tips, and variations. By the end, you’ll be ready to whip up a batch that’ll have your family asking for second helpings!
What Are Chicken Enchiladas?
Chicken Enchiladas hail from Mexico, where they’ve become a beloved staple in Mexican cuisine. Traditionally, these delectable rolls are made with corn tortillas filled with chicken and smothered in a vibrant enchilada sauce before being baked to perfection. The taste is a harmonious blend of savory, spicy, and creamy—think tender chicken enveloped in a warm tortilla, kissed by the heat of chili peppers, and finished with rich, melted cheese.
Unique to this dish is its adaptability. You can spice it up or tone it down, and the textures range from the soft tortillas to the gooey cheese. Whether you’re cooking for a weekday dinner or a festive gathering, Chicken Enchiladas are the perfect dish to bring everyone together.
Why You’ll Love This Recipe
Quick & Easy: Unlike those complicated restaurant dishes that leave you yearning for more, this recipe takes only about 45 minutes from start to finish. You’ll have delicious, homemade Chicken Enchiladas on the table in no time!
Budget-Friendly: Eating out can get pricey, especially for quality Mexican food. This recipe showcases how easy it is to make a fantastic dinner at home without breaking the bank.
Customizable: Want to switch things up? You can easily make these enchiladas vegetarian by swapping the chicken for black beans or jackfruit, or spice them up with some jalapeños for a fiery kick. The possibilities are endless!
Healthy Twist: Incorporating Greek yogurt instead of sour cream makes it a healthier option while retaining creaminess. Combined with higher protein and fiber from the beans and chicken, you’ll feel satisfied without the guilt.
Make-Ahead Convenience: These enchiladas are perfect for meal prepping! You can assemble them ahead of time and pop them in the oven just before serving. They also freeze beautifully, making them ideal for busy nights.
Ingredients Section
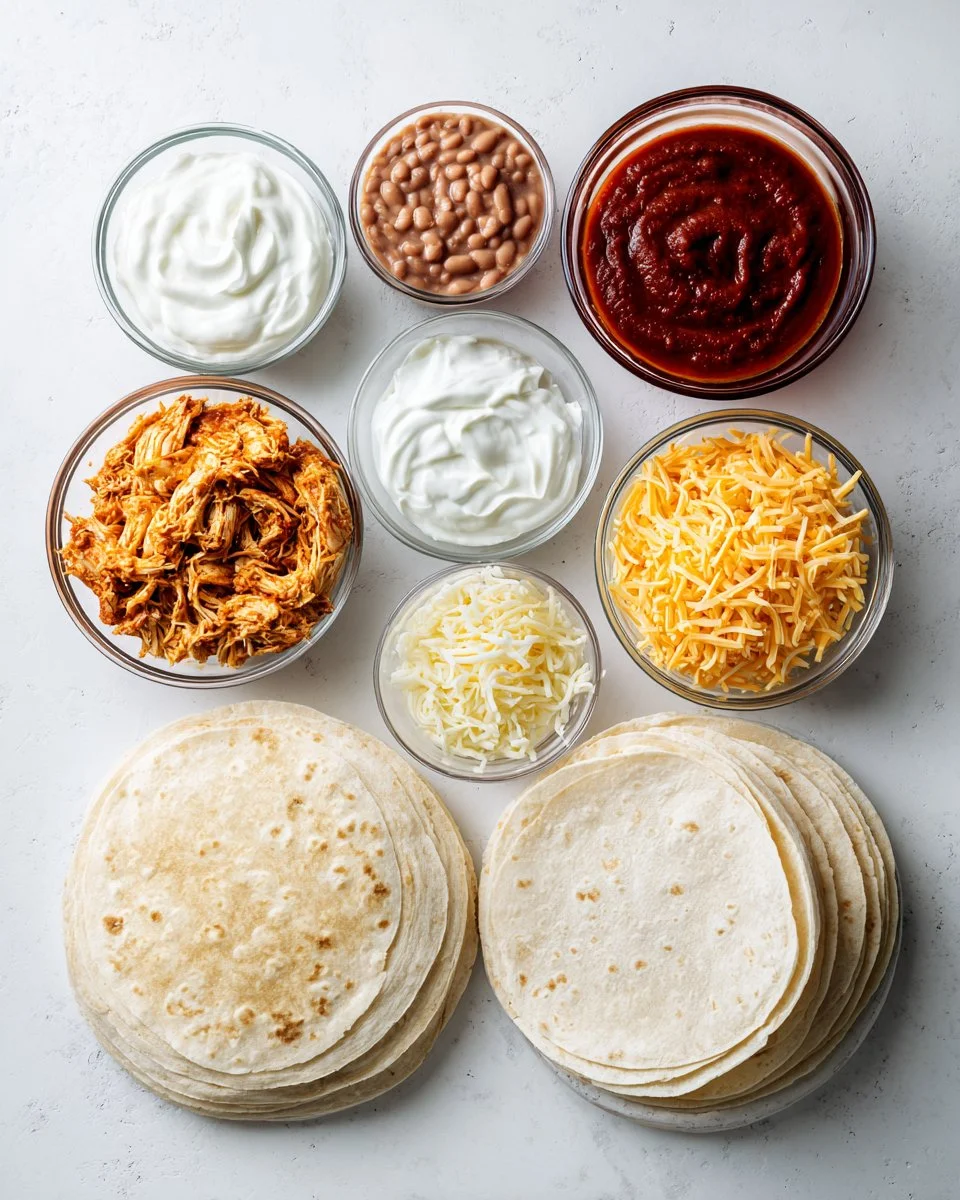
Before we dive into the cooking process, let’s gather our ingredients! Choose high-quality products for the best results:
Filling:
- 3 cups shredded chicken (280g) – Use cooked rotisserie chicken for convenience or meal-prepped chicken for a healthier option.
- 1/2 cup refried beans (120g) – Look for canned varieties with no added preservatives, or make your own for extra flavor.
- 3/4 cup Greek yogurt (170g) – This adds creaminess while keeping it lighter. Opt for full-fat for richer taste.
- 1 tbsp taco seasoning – You can make your own spice mix or go for your favorite brand.
- 1.5 cups shredded Mexican cheese (168g), divided – I recommend a blend of Monterey Jack, cheddar, and queso blanco for balanced flavor.
Sauce:
- 10 oz. can red enchilada sauce – For a homemade touch, try making your own sauce from scratch!
Wrap:
- 8 flour tortillas (8-inch) – Choose fresh tortillas for the best flavor, or even use corn tortillas if you prefer a gluten-free option.
Prep Notes:
- Ensure your butter and chicken are at room temperature, making it easier to mix and spread everything evenly.
Step-by-Step Instructions
For the Filling:
- Combine Ingredients: In a large mixing bowl, combine shredded chicken, refried beans, Greek yogurt, taco seasoning, and 1 cup shredded cheese. Mix well until all ingredients are thoroughly blended. You should have a creamy consistency.
For the Sauce:
- Prepare the Baking Dish: Preheat your oven to 350°F (175°C). Spread a thin layer of enchilada sauce on the bottom of a 9×13-inch baking dish to prevent sticking.
Assemble:
- Fill the Tortillas: On a flat surface, lay out a tortilla. Spoon a generous amount of the filling into the center. Roll it tightly to enclose the filling and place the seam-side down in the baking dish. Repeat with the remaining tortillas and filling.
- Top It Off: Pour the remaining enchilada sauce over the arranged tortillas, ensuring they’re well-covered. Sprinkle the remaining cheese on top for that perfect golden texture.
Bake:
- Cook to Perfection: Bake in the preheated oven for 20-25 minutes, or until the cheese is fully melted and bubbling. For a delightful golden top, you can broil it for an extra 2-3 minutes—just keep an eye on it!
Chef’s Tips:
- Avoid the mistakes of tearing your tortillas by warming them briefly in the microwave or on a skillet for a few seconds before filling.
- If your enchilada sauce is too thick, add a splash of chicken broth to loosen it.

Expert Tips & Tricks
Storage: If you have leftovers, store them in an airtight container in the fridge for up to 3 days. Reheat in the oven at 350°F for 15-20 minutes for the best results.
Make-Ahead: You can assemble these enchiladas a day in advance and keep them ready to bake. Just cover with foil and keep in the fridge until you’re ready to cook.
Troubleshooting: If your tortillas tear, try softening them in a damp paper towel in the microwave for about 30 seconds.
Perfectly Shredded Chicken: For juicy shredded chicken, cook it in a slow cooker with some broth or spices for about 6 hours on low. It will shred beautifully and save you time!
Freezing: If you plan to freeze them, do so before baking. Prepare everything and cover tightly. They can last up to 2 months. When ready to eat, just thaw them in the fridge and bake as directed.
Variations: You can switch the protein to beef, ground turkey, or even a vegetarian option like lentils or portobello mushrooms for a delicious twist!
Serving Suggestions
These Chicken Enchiladas are divine on their own, but why not serve them with a side of Mexican rice or a fresh green salad dressed with lime vinaigrette? You can elevate the experience with a dollop of guacamole or sour cream on top and garnished with fresh cilantro for a pop of color. Perfect for family gatherings, Taco Tuesdays, or a cozy movie night!
Variations & Substitutions
Flavor Combinations: Spice things up by adding diced green chiles, jalapeños, or even corn to the filling. For a sweeter twist, try adding roasted sweet potatoes in place of beans.
Dietary Restrictions: These enchiladas are easily adaptable! Use corn tortillas for gluten-free, or replace chicken with beans, tofu, or roasted vegetables for a plant-based option.
Seasonal Variations: In the fall, add pumpkin puree for a seasonal twist! In summer, fresh corn and bell peppers can brighten the flavor profile.
Nutrition & Storage Info
- Prep Time: 15 minutes
- Cook Time: 25 minutes
- Total Time: 40 minutes
- Yield: Serves 4-6
- Estimated Calories: Approximately 400 calories per serving (based on serving size and ingredients)
Storage Instructions:
- Room Temperature: Best enjoyed fresh, but if left out, consume within 2 hours.
- Fridge: Store in an airtight container for up to 3 days.
- Freezer: They can be frozen before baking for up to 2 months. Thaw before baking.
FAQ Section
Can I use corn tortillas instead of flour?
- Yes! Just ensure to warm them up to prevent tearing.
How can I make these enchiladas spicier?
- Add diced jalapeños or opt for a spicy enchilada sauce.
What if I don’t have Greek yogurt?
- Sour cream is a great substitute, or you can use crème fraîche.
Can I use other meats?
- Absolutely! Ground turkey, beef, or even pork will work perfectly.
How do I know when they’re done baking?
- Look for bubbling cheese and a slightly crisp top.
Can I double this recipe?
- Yes, simply adjust your cooking vessel size accordingly!
Are they gluten-free?
- Using corn tortillas makes them gluten-free.
How long do leftovers last?
- They’re best eaten within 3 days when stored properly in the fridge.
Can I freeze the unbaked enchiladas?
- Yes! Just wrap them tightly and bake from frozen, adding extra time.
What toppings do you recommend?
- Fresh cilantro, avocado, or a sprinkle of lime zest add a delightful freshness.
Conclusion
These Chicken Enchiladas aren’t just a meal; they’re a slice of comfort and family tradition that you can recreate in your kitchen! In just a few simple steps, you can whip up a batch that leaves your house smelling incredible and your taste buds singing. I encourage you to give this recipe a try, and I’d love to hear your thoughts! What memories does it stir for you? Feel free to leave a comment below or check out more delicious recipes on my blog, like my favorite Mexican Rice or Raspberry Lemonade Refreshing Raspberry Lemonade: The Ultimate Summer Sip!

Chicken Enchiladas
Ingredients
Method
- In a large mixing bowl, combine shredded chicken, refried beans, Greek yogurt, taco seasoning, and 1 cup of shredded cheese. Mix well until all ingredients are thoroughly blended.
- Preheat your oven to 350°F (175°C). Spread a thin layer of enchilada sauce on the bottom of a 9×13-inch baking dish to prevent sticking.
- On a flat surface, lay out a tortilla. Spoon a generous amount of the filling into the center.
- Roll the tortilla tightly to enclose the filling and place it seam-side down in the baking dish. Repeat with the remaining tortillas and filling.
- Pour the remaining enchilada sauce over the arranged tortillas, ensuring they’re well-covered.
- Sprinkle the remaining cheese on top.
- Bake in the preheated oven for 20-25 minutes, or until the cheese is melted and bubbling. Broil for an extra 2-3 minutes for a golden top if desired.