A few years ago, I found myself hosting a small family gathering in our cozy kitchen—a place where laughter and love are always bubbling over, just like the treats I whip up! As dessert time rolled around, I wanted something light yet indulgent. Enter Cheesecake Mousse: a creamy concoction that was as much a delight to make as it was to eat. One spoonful of this airy bliss had everyone raving, reliving their childhood favorite cheesecake memories while sinking into pure bliss.
What makes this Cheesecake Mousse recipe stand out from all the rest is its light and fluffy texture, which captures the essence of a traditional cheesecake without the heavy crust. Unlike dense puddings or heavy desserts, this mousse promises a heavenly balance of cheesy goodness and whipped cream lightness. Sharing this treat reminds me of family gatherings and comfort, where every scoop feels like a warm hug.
Today, I’ll guide you step-by-step through crafting this gem at home, ensuring you learn the secrets to making it just right and impressing your guests—or treating yourself to something extraordinary. So, let’s dive into this easy Cheesecake Mousse recipe together!
What are Cheesecake Mousse?
Cheesecake Mousse is the delightful offspring of two beloved desserts: classic cheesecake and fluffy mousse. Originating from culinary traditions that merge rich flavors with airy textures, this treat offers a balance that few desserts can. You get all the decadent sweetness of cheesecake, but with a lightness that comes from carefully whipped cream and egg whites.
The taste is simply divine—imagine creamy vanilla cheesecake whipped into a light, cloud-like texture with a smooth finish that melts in your mouth. It’s sweetened perfectly, with a hint of tanginess from the cream cheese that’s balanced flawlessly by the airy whipped heavy cream.
When should you whip up a batch? For any special occasion, holiday, or a cozy night in, this Cheesecake Mousse is sure to please. It’s versatile enough for birthdays, date nights, or even casual weekend brunches.
Why You’ll Love This Recipe
If you’re contemplating diving into the world of Cheesecake Mousse, let me share a few reasons why this recipe is a must-try:
Unmatched Taste and Texture: Unlike store-bought desserts, this mousse is made from scratch, offering a freshness that’s difficult to replicate in pre-packaged versions.
Budget-Friendly Delight: Homemade Cheesecake Mousse is surprisingly cost-effective. For less than ten dollars, you can make a generous batch that serves plenty—perfect for impressing friends and family!
Customization Superstar: You can play with flavors! Try adding fruit purees, chocolate, or even flavored extracts to customize your mousse to suit your mood.
Effortlessly Elegant: This dessert looks as luxurious as it tastes, making it perfect for special occasions—plus, it requires no baking, so it’s a dream for novice bakers!
Time-Friendly: It takes less than 30 minutes to whip up, and then the hardest part is waiting for it to chill. Total time between prep and refrigerating is around 1-2 hours.
These incredible benefits make this Cheesecake Mousse a standout among dessert recipes, and I promise you won’t be disappointed.
Ingredients
Let’s gather our ingredients! Here’s what you’ll need:

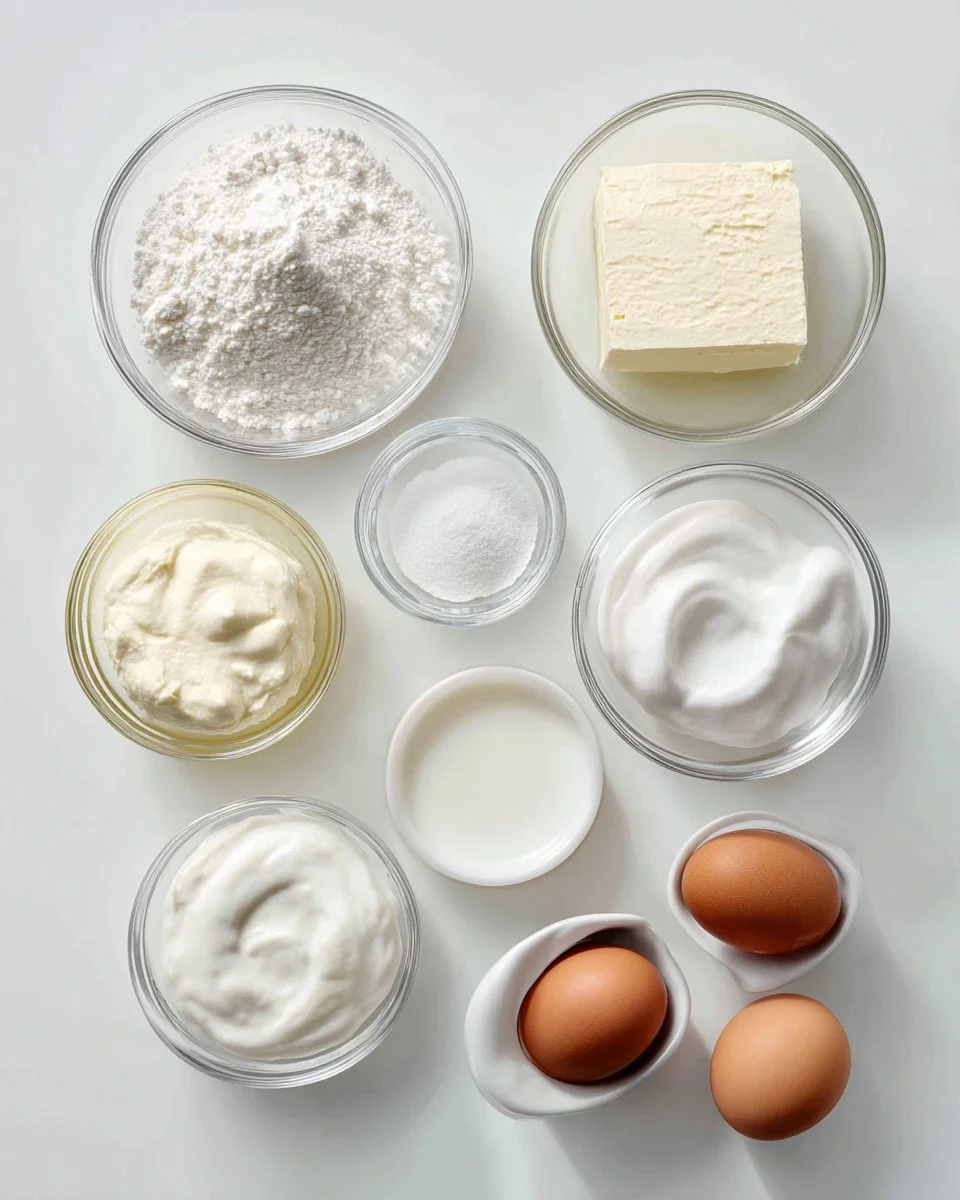
4 ounces cream cheese, softened: Use high-quality cream cheese for the best flavor. Softening is key—leave it out for about an hour.
1/2 cup confectioners’ sugar: This gives the mousse sweetness and helps achieve that silky texture. You could use a sugar substitute if needed.
2 cups heavy cream: Make sure it’s cold; the colder it is, the quicker and fluffier it will whip.
1/2 teaspoon vanilla extract: Opt for pure vanilla extract for an enriched flavor. Homemade is even better if you have it!
1 pinch kosher salt: Just a hint enhances the flavors—don’t skip it!
4 large egg whites, at room temperature: Room temperature egg whites whip up to a fluffier texture.
Make sure your kitchen is prepped: Have your cream cheese softened and your heavy cream chilled. Now, let’s proceed with making this luscious dessert!
Step-by-Step Instructions
Chill Your Tools: Before starting, place the bowl and whisk attachment from your stand mixer into the freezer to chill for about 15 minutes. Trust me, a cold bowl makes a difference in aeration!
Mix the Base: Once chilled, add the softened cream cheese and confectioners’ sugar to the bowl. Mix on medium-high speed until fully combined; you want it smooth with no lumps (about 2 minutes).
Add Heavy Cream: Slowly pour in the heavy cream, followed by the vanilla extract and a pinch of salt. Mix gently until stiff peaks form. Make sure to stop occasionally to scrape down the sides of the bowl for an even consistency.
Prepare Egg Whites: In a clean and dry bowl, add the room temperature egg whites. Beat until stiff peaks form, which should take about 5 minutes.
Combine the Mixtures: Gently fold the whipped egg whites into the whipped cream cheese mixture—do this slowly to maintain as much of the airiness as possible.
Chill: Pour your smooth mixture into serving cups or a large bowl. Chill the mousse in the refrigerator for 1-2 hours to allow it to set.
And voila! You’re just moments away from a delightful Cheesecake Mousse.
Chef’s Tip: Be careful when folding to avoid deflating the airiness!
Expert Tips & Tricks
Here are some professional tips to ensure your Cheesecake Mousse comes out flawlessly:
Quality Counts: Use high-quality ingredients—especially cream cheese and heavy cream—as they make a big difference in flavor!
Egg Whites: Ensure no yolk is mixed with your egg whites; even a little fat can prevent them from whipping properly.
Chilling is Key: For the best results, chill your mousse overnight. It enhances the flavor and allows it to set beautifully.
Storage: Cheesecake Mousse can be stored in the fridge in an airtight container for up to 3 days. Avoid freezing if possible, as the texture may change.
Make-Ahead Magic: Prepare it a day in advance for dinner parties; it only gets better as it chills!
No More Flat Mousse: If you find your mousse didn’t puff up as much as you’d like, it might be because the whipped cream wasn’t fully whipped before combining with the other ingredients.
Now that you have these tricks up your sleeve, you’re ready to impress!
Serving Suggestions
This luxurious Cheesecake Mousse is delightful on its own, but pairing it with a few treats can elevate it even further:
Garnish: Top with fresh berries, chocolate shavings, or a dollop of whipped cream for a stunning presentation.
Presentation Ideas: Serve in individual cups to add that gourmet touch, perhaps even layering with crushed graham crackers for some texture.
Occasion Recommendations: This mousse shines at parties, romantic dinners, and holiday gatherings, making it an all-star dessert.
Variations & Substitutions
Feeling adventurous? Here are some creative spins on the classic Cheesecake Mousse:
Flavors: Add lemon zest for a refreshing tartness or swirl in some cocoa powder for a chocolate cheesecake mousse.
Dietary Adaptations: Substitute the cream cheese with vegan cream cheese for a dairy-free version, and use coconut cream in place of heavy cream.
Seasonal Variations: In fall, try a pumpkin cheesecake mousse by blending in pumpkin puree and spices, or in summer, opt for strawberries or peaches for a fruity flair.
Nutrition & Storage Info
- Prep Time: 30 minutes
- Cook Time: N/A
- Total Time: 1.5-2 hours (including chilling)
- Yield: Serves 4-6 people
- Estimated Calories: Approximately 350-400 calories per serving (based on serving size)
- Storage Instructions: Store leftovers in an airtight container in the refrigerator for up to 3 days.
FAQ Section
Here are answers to common questions about making Cheesecake Mousse:
Can I use low-fat cream cheese?
Yes, though the texture and flavor might differ slightly.How long does Cheesecake Mousse last?
It keeps well for up to 3 days in the fridge.Is it necessary to use egg whites?
Yes, they add volume and fluffiness; however, you can omit them for a simpler version but expect a denser mousse.Can I make this ahead of time?
Absolutely! It can be prepared a day in advance for the best flavor and texture.What if my mousse is too runny?
If it is too runny, make sure that your cream was whipped to stiff peaks. You can also try to re-whip it.What’s the best way to serve it?
Serving it in individual cups with fresh fruit garnishes or chocolate curls creates an elegant touch.Can I freeze this mousse?
It’s not recommended due to texture changes, but you can store it in the fridge.What’s the best way to fold without deflating?
Use a spatula and fold gently from the bottom up, rotating the bowl as you go.Is there a vegan version?
Yes! Use vegan cream cheese and coconut cream instead of heavy cream.Do I have to let it chill?
Yes, chilling is essential for the mousse to set and develop its best flavor!

Conclusion
This Cheesecake Mousse recipe is a true gem, merging the richness of classic cheesecake with the lightness of mousse, creating a dessert that’s not only delicious but also brings a touch of nostalgia and comfort. I encourage you to whip up this easy recipe and enjoy it with family or friend gatherings, or simply indulge in a little self-care.
I’d love to hear your thoughts once you try it—did your family rave about it like mine did? And if you’re looking for more sweet inspirations, check out my blog for other delightful recipes that bring joy to the table!
Irresistibly Delicious Healthy Chocolate Chip Sweet Potato Bread Recipe!
Happy baking!

Cheesecake Mousse
Ingredients
Method
- Chill Your Tools: Before starting, place the bowl and whisk attachment from your stand mixer into the freezer to chill for about 15 minutes.
- Mix the Base: Once chilled, add the softened cream cheese and confectioners’ sugar to the bowl. Mix on medium-high speed until fully combined; you want it smooth with no lumps (about 2 minutes).
- Add Heavy Cream: Slowly pour in the heavy cream, followed by the vanilla extract and a pinch of salt. Mix gently until stiff peaks form. Make sure to stop occasionally to scrape down the sides of the bowl for an even consistency.
- Prepare Egg Whites: In a clean and dry bowl, add the room temperature egg whites. Beat until stiff peaks form, which should take about 5 minutes.
- Combine the Mixtures: Gently fold the whipped egg whites into the whipped cream cheese mixture—do this slowly to maintain as much of the airiness as possible.
- Chill: Pour your smooth mixture into serving cups or a large bowl. Chill the mousse in the refrigerator for 1-2 hours to allow it to set.