
As the first hints of spring begin to bloom, my thoughts drift to cherished family traditions—none more special than the aroma of baking bread wafting through our home. Every Easter, my loved ones and I gather around the kitchen, flour dusted everywhere, as we craft our beloved Easy Sweet Italian Easter Bread. This isn’t just any bread; it’s a token of love, rich with symbolism and warmth.
What makes this sweet bread so special? Beyond its beautiful braided form adorned with colorful eggs, it’s the taste that transports me back to my grandmother’s kitchen, where laughter mingled with the scent of citrus and warm vanilla, filling our hearts with comfort. This recipe stands apart from others because it’s not just about the ingredients—it’s the memories infused in every loaf.
Join me on this delicious journey, and I promise to teach you the secrets to creating a bread that embodies tradition, love, and joy. With a few simple ingredients and some love, you will be whipping up a loaf that will make your family savor every bite!
What are Easy Sweet Italian Easter Bread?
Originating from Italian-American culture, Easy Sweet Italian Easter Bread is a festive, yeast-leavened bread that combines rich flavors with vibrant colors. Traditionally baked to celebrate Easter, this bread features a slightly sweet, soft texture and a delightful hint of lemon zest, making each bite a taste explosion. The beautifully braided shape not only showcases your baking skills but also symbolizes the bonds of family as it’s often made and shared in the spirit of togetherness.
What truly makes this bread unique is its versatility. You can mold it into different shapes or add unique flavors according to personal taste or seasonal preferences. Traditionally, it’s decorated with dyed eggs, offering a stunning centerpiece for your holiday table. Whenever there’s a family gathering—whether Easter or a simple spring brunch—this bread finds its way into our hearts and homes.
Why You’ll Love This Recipe
Family-Friendly: Baking Easy Sweet Italian Easter Bread is a fantastic activity for families, especially with children who’d love to help with braiding the dough and adding the colorful eggs.
Cost-Effective: Why settle for store-bought when you can create something homemade and delightful? This recipe brings together basic ingredients that you probably already have, making it a budget-friendly option for special occasions.
Customization at Your Fingertips: Want to add a twist? You can customize this bread with different flavors like almond extract, dried fruit, or even chocolate chips!
A Feast for the Eyes and Palate: Forget bland, store-bought bread! Not only will it taste incredible, but you can present it beautifully, making it a stunning centerpiece for any celebration.
Easy to Make: Perfect for bakers of any skill level, from beginners to seasoned pros. With just a few steps, you’ll soon be kneading dough and shaping loaves.
Make Ahead Possible: This bread can be prepared a day in advance, allowing flavors to develop and giving you the freedom to enjoy your holiday feast stress-free.

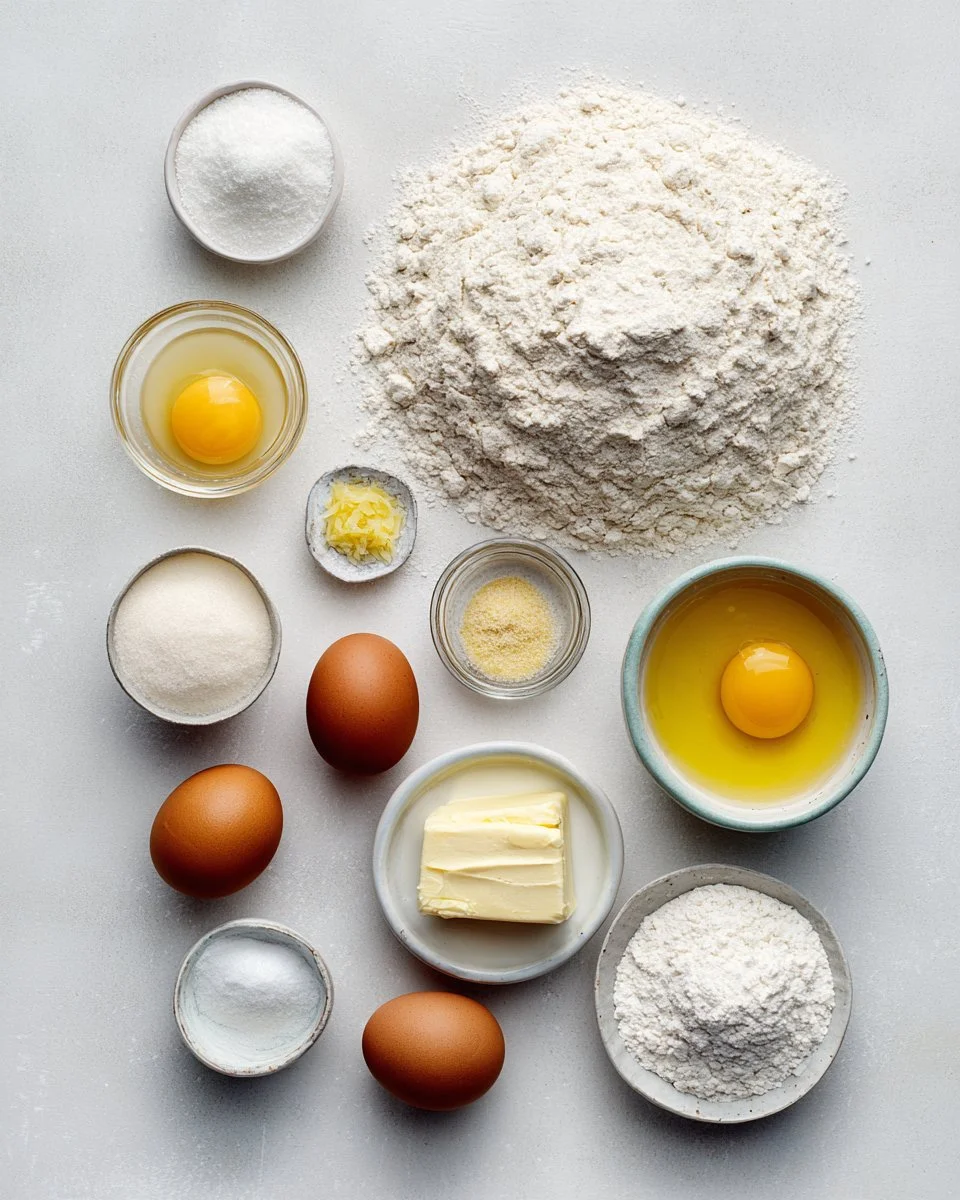
Ingredients
To create your Easy Sweet Italian Easter Bread, you’ll need:
- 4 cups all-purpose flour: Use high-quality flour for the best texture. Brands like King Arthur Flour or Bob’s Red Mill are my favorites.
- 1/2 cup sugar: Regular granulated sugar works perfectly.
- 1 packet (2 1/4 teaspoons) active dry yeast: Make sure your yeast is fresh for the best rise.
- 1 teaspoon salt: Enhances flavor.
- 1 cup milk: Warm milk helps activate the yeast. Aim for around 110°F (43°C).
- 1/2 cup butter (melted): Gives the bread a rich taste—just remember to let it cool slightly before mixing into the dough!
- 2 eggs: Large eggs at room temperature for easier incorporation.
- Eggs for decoration (dyed or colored): Use natural food dyes for a whimsical touch or store-bought for convenience.
- 1 teaspoon vanilla extract: Pure extracts bring depth to your flavors.
- Zest of 1 lemon: A burst of citrus that elevates the sweet notes.
Prep Notes: Ensure your butter is at room temperature to mix easily. The eggs should also be at room temperature for better incorporation.
Step-by-Step Instructions
- Combine Dry Ingredients: In a large bowl, whisk together 2 cups of flour, sugar, yeast, and salt until well blended.
- Warm Milk Mixture: In a separate saucepan, gently heat the milk and melted butter until warm (not hot) to the touch (around 110°F).
- Mix Mixtures Together: Pour the warm milk mixture into the dry ingredients and stir with a wooden spoon or spatula until combined.
- Add Eggs and Flavorings: Add the eggs, vanilla extract, and lemon zest. Mix until everything is well incorporated.
- Gradually Add Flour: Gradually add the remaining flour, 1/2 cup at a time, until a soft dough forms. You may not need all of it, so be attentive to texture.
- Knead the Dough: Transfer the dough to a floured surface and knead for about 10 minutes until it’s smooth and elastic.
- First Rise: Place the dough in a greased bowl, cover with a kitchen towel, and let it rise for about 1 hour or until doubled in size.
- Preheat the Oven: About 20 minutes before baking, preheat your oven to 350°F (175°C).
- Shape the Bread: Punch down the risen dough to release air. Divide it into three equal portions, rolling each into a long rope. Braid the three ropes together and pinch the ends to secure.
- Prepare for Baking: Place the braided dough on a baking sheet lined with parchment paper. Nestle your colorful eggs into the dough.
- Second Rise: Cover the bread with the kitchen towel again and let it rise for another 30 minutes.
- Bake: Bake in your preheated oven for 25-30 minutes, or until golden brown and the bread sounds hollow when tapped.
- Cool Before Serving: Allow the bread to cool on a wire rack before slicing.
Chef’s Tip: For a beautiful glaze, brush melted butter on top right after removing it from the oven!
Expert Tips & Tricks
- Flour for Kneading: Feel free to add a little flour while kneading if the dough is too sticky, but avoid adding too much as it may dry out the bread.
- Storage Recommendations: This bread is best enjoyed fresh but can be stored in an airtight container for 2-3 days at room temperature. It can also be frozen for up to three months—just thaw overnight in the fridge.
- Make-Ahead Instructions: You can prepare the dough a day ahead and refrigerate it after kneading. Just let it come to room temp for about an hour before shaping and baking.
- Common Problems: If your dough doesn’t rise properly, check that your yeast is fresh and that the milk wasn’t too hot, which can kill the yeast.
Serving Suggestions
Slice up your Easy Sweet Italian Easter Bread and serve it fresh with a spread of butter or honey. It pairs beautifully with a light salad or seasonal fruits, making it an excellent addition to your Easter brunch buffet. For a fun presentation, consider serving it on a colorful floral tray surrounded by pastel candles or spring flowers.
Variations & Substitutions
- Flavor Combinations: For an extra twist, think about adding a splash of orange zest or a hint of almond extract for a more complex flavor.
- Dietary Restrictions: Swap regular butter for a dairy-free alternative and use almond milk for a vegan version. Just make sure to use an egg substitute.
- Seasonal Variations: In the fall, try adding pumpkin spice to your bread, or during the winter holidays, mix in nuts or dried fruit.
Nutrition & Storage Info
- Prep Time: 30 minutes
- Cook Time: 30 minutes
- Total Time: 1 hour 30 minutes (including rising times)
- Yield: Approximately 12 servings
- Estimated Calories: Around 180 calories per slice
- Storage Instructions: Best enjoyed fresh, can be stored at room temperature for 2-3 days or frozen for 3 months.
FAQ Section
Can I use whole wheat flour?
- Yes! You can substitute part of the all-purpose flour for whole wheat flour, but keep in mind that it will change the texture and flavor slightly.
What can I do if my dough isn’t rising?
- Ensure your yeast is fresh and that the milk is only warm, not hot. You can also place the dough in a warm, draft-free area to encourage rising.
Can I add nuts or chocolate?
- Absolutely! Adding chocolate chips or chopped nuts can bring a delicious twist to your bread.
How do I know when the bread is done baking?
- The bread should be golden brown on top and sound hollow when tapped on the bottom. A thermometer inserted into the bread should read about 190°F (88°C).
Can I use colored eggs that aren’t hardboiled?
- It’s best to use hardboiled eggs to prevent messes, but you could decorate some faux eggs if you’re using them purely for decoration!
Is this bread sweet?
- Yes, but it’s not overly sweet. The sugar combines with the lemon zest and vanilla to enhance flavors without being overwhelming.
How should I store leftover bread?
- Keep it in an airtight container at room temperature, or wrap it tightly and freeze for longer storage.
Can I make the dough ahead of time?
- Yes, you can prepare the dough a day in advance and refrigerate it, allowing it to come to room temperature before shaping.
What are some tips for dyeing eggs?
- Use natural dyes or food coloring, and remember to let the eggs dry completely before placing them in the dough.
Can I make a gluten-free version?
- Yes, by substituting the all-purpose flour with a gluten-free all-purpose blend. Keep in mind that the texture may vary.
Conclusion
The Easy Sweet Italian Easter Bread is not just a recipe; it’s a chance to create and share joyous moments with family and friends. Each loaf is a delightful blend of love, tradition, and creativity, making it a staple for your holiday celebrations. So why not give this recipe a try and watch as it brings your loved ones together? I’d love to hear your experiences—leave a comment below sharing your thoughts or even your own family variations. And don’t forget to check out more delightful recipes on the blog that will warm your heart and home!
Heavenly Carrot Cake Cheesecake Bars: A Delicious Twist on a Classic Favorite