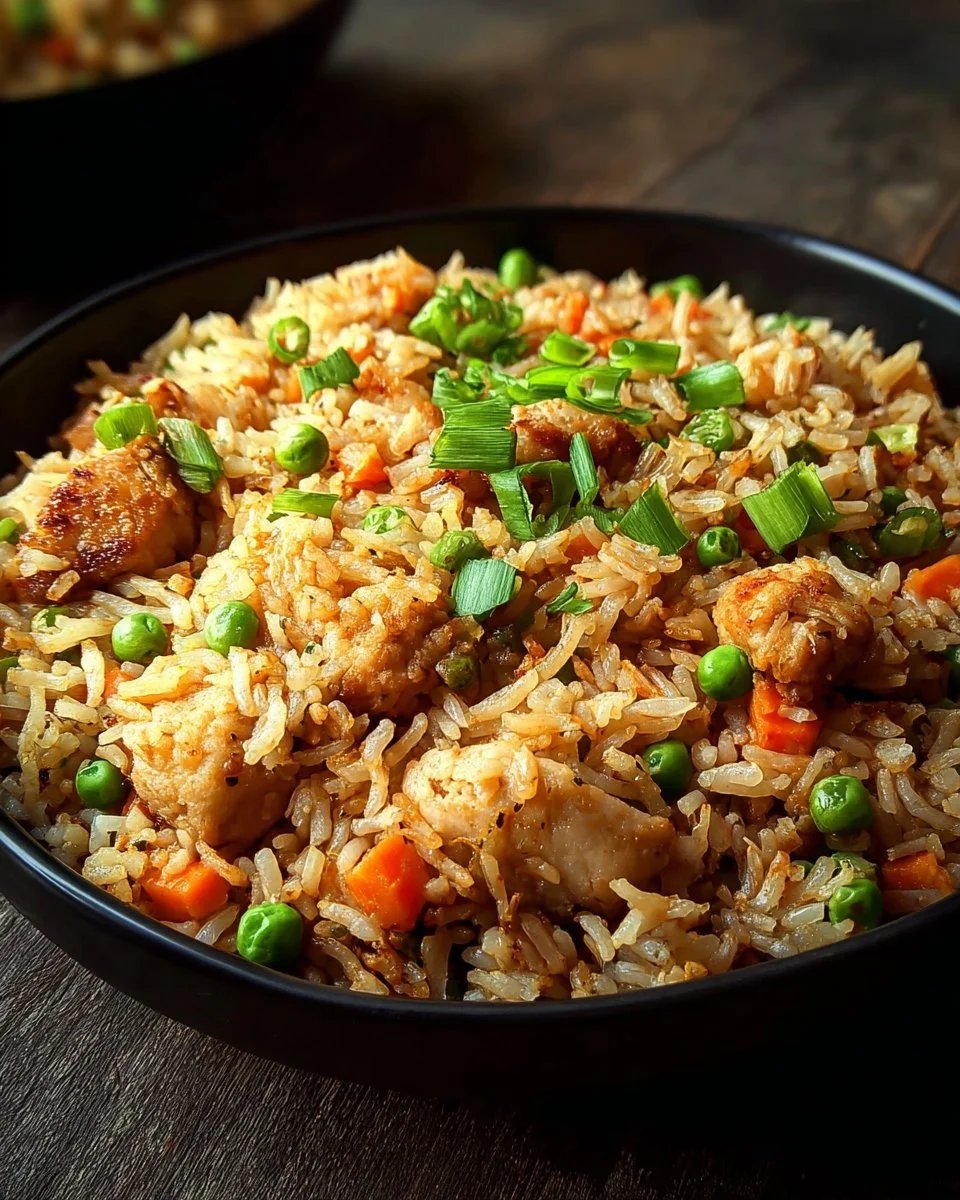
I’ll never forget the first time I made High Protein Crispy Garlic Chicken Fried Rice. It was a chilly evening, and we had just returned from an adventure outdoors, our cheeks flushed from the cold. The craving for something warm and hearty hit hard, and I found myself rummaging through the fridge, piecing together a delicious dinner that would not only nourish my family but also fill their hearts. This dish has since become a staple, intertwining itself with family memories and cozy gathering moments.
So, what makes this high-protein twist on the classic fried rice so special? It’s not just about the golden, crispy chicken or the aromatic garlic hitting your senses with every bite; it’s about how it packs a punch of protein, making it a satisfying meal that keeps everyone fueled and happy. Unlike store-bought versions laden with preservatives, this recipe is the real deal—fresh, flavorful, and easy to customize!
Today, I’ll walk you through my tried-and-true method so you can create this unforgettable dish at home. You’ll learn about ingredient quality, cooking tips, and the magic behind achieving that crispy perfection. Ready to take your weeknight dinners to the next level? Let’s dive in!
What Are High Protein Crispy Garlic Chicken Fried Rice?
Originating from the vibrant street food scene of Asia, fried rice has long captivated taste buds around the world with its versatility and satisfying nature. High Protein Crispy Garlic Chicken Fried Rice elevates this beloved dish by incorporating tender chicken breast and a hearty dose of protein, making it not only for everyday occasions but also a perfect post-workout meal.
The taste? Think of savory, buttery goodness infused with the aromatic scent of garlic, a crunchy texture from the crisped-up chicken, and a medley of colorful veggies that bring vibrancy to your plate. It’s a wonderful symphony of flavors where every bite feels like a comforting hug—a dish you can’t help but crave!
Whether you’re whipping up a quick dinner for your family or inviting friends over for a fun night in, this recipe is bound to impress. You’ll love how it comes together quickly yet tastes like a restaurant-quality meal. The crunch, the fragrance, and that rush of satisfaction after eating will make this your go-to dish!
Why You’ll Love This Recipe
Protein-Packed Goodness: Each serving is loaded with high-quality protein thanks to the boneless, skinless chicken breast. In a world where many fried rice options lack nutritional value, this version keeps you energized.
Cost-Effective: With simple ingredients and a budget-friendly price tag, you can whip up a feast without breaking the bank. Plus, I’ve found that using day-old rice not only improves the flavor but also helps save leftovers from the fridge.
Customizable: Whether you prefer extra veggies, a splash of spicy sauce, or a vegetarian version, this recipe lets you get creative. Add your favorite vegetables or switch up the protein based on what you have at home.
Quick & Easy: Perfect for a busy weeknight, the entire process takes just about 30 minutes from prep to table. You can trust this recipe to save the day when time is tight.
Restaurant Quality at Home: Forget about takeout! With this recipe, you can create a delicious meal that rivals your favorite restaurant dish—all made in your very own kitchen.
Are you excited yet? Let’s get started!
Ingredients
{image_template}
- 2 cups cooked jasmine or basmati rice (preferably day-old for best texture)
- 1 lb boneless, skinless chicken breast, cut into small pieces
- 4 cloves garlic, minced (the more, the merrier!)
- 2 tbsp olive oil or sesame oil (I love sesame oil for that nutty flavor)
- 1 cup frozen peas and carrots, thawed
- 3 green onions, sliced (plus extra for garnish if desired)
- 2 large eggs, lightly beaten (or try scrambled tofu for a vegan twist!)
- 3 tbsp low-sodium soy sauce (you can adjust this to taste)
- 1 tbsp oyster sauce (optional but highly recommended for depth)
- ½ tsp ground black pepper (freshly ground preferred)
- 1 tsp cornstarch (for chicken coating)
- 1 tbsp water (for cornstarch slurry)
Ingredient Quality and Substitutions
- Use fresh chicken breasts for the best flavor. If you’re in a pinch, rotisserie chicken works great too!
- Rice: If you don’t have day-old rice, freshly cooked rice can work as long as you let it cool and dry out a bit.
- For vegetable options, feel free to swap in whatever you have on hand, like bell peppers, corn, or snap peas.
- To elevate the dish, try using premium soy sauce and quality oyster sauce—small details make a big difference!
Step-by-Step Instructions
Prep the Chicken: Toss chicken pieces with cornstarch until fully coated. This will give your chicken that desired crispy texture. Let it sit while you prepare the other ingredients.
Cook the Chicken: Heat 1 tablespoon of oil in a large skillet or wok over medium-high heat. Add the chicken and cook for about 5-7 minutes, stirring occasionally, until golden and crispy. Then, set aside on a plate.
Sauté the Garlic: In the same skillet, add the remaining oil and minced garlic. Sauté for approximately 30 seconds, being careful not to burn it—burnt garlic can ruin your dish!
Scramble the Eggs: Push the garlic to one side of the skillet and pour your beaten eggs into the clear side. Scramble until just set but still slightly runny, then mix well with the garlic.
Combine Ingredients: Add the cooked rice, thawed peas and carrots, and sliced green onions to the pan. Drizzle in the soy sauce and oyster sauce. Stir-fry everything together to ensure an even distribution of flavors.
Return the Chicken: Add the crispy chicken back to the skillet and toss everything gently to combine. The key here is to ensure every bite has a little bit of everything—chicken, veggies, and rice!
Finish with Seasoning: Sprinkle black pepper over the top and taste to see if it needs any extra seasoning. Serve hot and enjoy the delicious aroma wafting through your kitchen!
Chef’s Tips: To add more flavor, consider marinating the chicken in a bit of soy sauce and garlic before coating with cornstarch. This extra step will really amp up the flavors!
Expert Tips & Tricks
Storage Tips: Store any leftovers in an airtight container in the fridge for up to 3 days. For longer storage, you can freeze it for up to a month—just reheat thoroughly before serving.
Make-Ahead Magic: Pre-cook the rice and chicken the night before and simply assemble in the morning for a quick weeknight dinner success.
Avoid Soggy Rice: The secret to perfect fried rice is to use day-old rice that has been in the fridge. Freshly cooked rice can turn mushy.
Tackle Overcooked Eggs: Scramble the eggs quickly and remove them from heat to avoid overcooking. You want them fluffy, not dry.
Customize Flavor: Don’t be afraid to sub in your favorite sauces or spices for a unique twist. A little chili paste can add a nice kick!
Serving Suggestions
Serve your High Protein Crispy Garlic Chicken Fried Rice alongside a fresh garden salad or some spring rolls for a rounded meal. For added flair, garnish with sesame seeds or extra green onions! This dish is perfect for casual dinners, meal prepping, or even impressing guests at a dinner party.
Variations & Substitutions
- Veggie Fried Rice: Swap out the chicken for tofu or tempeh and double the veggies for a hearty plant-based dish.
- Seasonal Variations: In fall, throw in some butternut squash or sliced brussels sprouts. In summer, consider fresh corn or zucchini.
- Additional Flavors: For an umami twist, try adding cooked shrimp or crab meat instead of chicken, and a dash of fish sauce.
Nutrition & Storage Info
- Prep Time: 10 minutes
- Cook Time: 20 minutes
- Total Time: 30 minutes
- Yield: Approximately 4 servings
- Estimated Calories: 450 calories per serving
- Storage: Allow your fried rice to cool completely before storing in the fridge for up to 3 days or freeze for up to a month. Reheat thoroughly in a pan or microwave.
FAQ Section
Can I use brown rice?
- Absolutely! Just note that it may require a longer cooking time and more liquid.
Is this recipe gluten-free?
- To make it gluten-free, use tamari instead of soy sauce and skip the oyster sauce.
What if I don’t have any day-old rice?
- No problem! Just spread freshly cooked rice on a baking sheet and let it cool for about 30 minutes before using.
Can I make this in advance?
- Yes! Cook everything and store it in the fridge, reheating when you’re ready to serve.
How can I make it spicier?
- Add sriracha or chili flakes for an extra kick!
Could I add other proteins?
- Of course! Shrimp, beef, or even leftover turkey work perfectly.
Can this recipe be made vegetarian?
- Yes! Substitute the chicken for tofu and omit the eggs for a veggie delight.
How long does it take to cook?
- From prep to table, it should take about 30 minutes.
What other vegetables can I use?
- Peppers, broccoli, snap peas—whatever you have on hand!
Is there a way to make this dish low-carb?
- Yes! Substitute rice with cauliflower rice for a low-carb option.
Conclusion
So there you have it—the delightful journey of creating High Protein Crispy Garlic Chicken Fried Rice! Not only is it packed with flavor and nutrition, but it also holds the power to create lasting family memories around the dinner table. I can’t wait for you to try this recipe and witness its magic in your home!
If you make this dish, I’d love to hear your thoughts! Share your feedback in the comments below or let me know how you customized it. And if you enjoyed this recipe, be sure to check out my other delectable dishes on the blog—let’s keep the culinary adventures going together!
Asparagus Stuffed Chicken Breasts: A Flavorful Delight for Your Dinner Table

High Protein Crispy Garlic Chicken Fried Rice
Ingredients
Method
- Toss chicken pieces with cornstarch until fully coated. Let it sit while you prepare the other ingredients.
- Heat 1 tablespoon of oil in a large skillet or wok over medium-high heat. Add the chicken and cook for about 5-7 minutes, stirring occasionally, until golden and crispy. Then, set aside on a plate.
- In the same skillet, add remaining oil and minced garlic. Sauté for approximately 30 seconds, being careful not to burn it.
- Push the garlic to one side of the skillet and pour your beaten eggs into the clear side. Scramble until just set but still slightly runny, then mix well with the garlic.
- Add the cooked rice, thawed peas and carrots, and sliced green onions to the pan. Drizzle in the soy sauce and oyster sauce. Stir-fry everything together.
- Add the crispy chicken back to the skillet and toss everything gently to combine.
- Sprinkle black pepper over the top and taste for extra seasoning. Serve hot.