When I think of comfort food, I’m transported back to my childhood, surrounded by the warm aroma of freshly baked cookies. Trail Mix Cookies evoke those sweet memories for me, like my mom baking during our family camping trips. We’d gather around the campfire, indulging in gooey, chocolatey treats that were packed with crunchy nuts and chewy dried fruits. It’s a treat that’s more than just a cookie—it’s a nostalgic bite of joy that brings families together.
But let’s be honest: not all cookies are created equal. Some can be overly sweet or loaded with chemicals, leaving us feeling sluggish. With my Trail Mix Cookies, you’ll find a wholesome balance. The blend of nutty flavors, textures that dance in your mouth, and the satisfaction of knowing you’re indulging in something nutritious? That’s what sets this recipe apart. They’re not just cookies; they’re a delicious hug in cookie form.
In this post, I promise you will learn how to whip up these guilt-free Trail Mix Cookies that are perfect for snacks, breakfasts, or even a post-workout treat. Let’s dive in!
What Are Trail Mix Cookies?
Trail Mix Cookies have origins deeply rooted in the adventurous spirit of trailblazers. Initially inspired by those fuel-packed trail mixes, they transformed into a cookie concept designed to provide energy and satisfaction for on-the-go individuals. Imagine biting into a warm cookie that’s crisp on the outside and soft in the middle, bursting with the flavors of rich chocolate, crunchy nuts, and sweet dried fruits.
What makes Trail Mix Cookies unique is their versatility. You can customize each batch based on your cravings or pantry contents. Perfect for hikes, picnics, or simply as a midday snack, these cookies can be a part of any occasion. Bake them on a cozy weekend, or prepare a batch to share during the holidays—let’s say goodbye to store-bought snacks and embrace homemade goodness!
Why You’ll Love This Recipe
If you’re still on the fence, I’m here to share why this Trail Mix Cookies recipe will become your go-to:
Wholesome Ingredients: Unlike store-bought cookies laden with artificial ingredients, my version harnesses the power of natural sugars and healthy fats. With coconut sugar, buckwheat flour, and nut butters, these cookies keep you energized without the sugar crash.
Cost-Effective: Have you seen the price tag on grocery store cookies with half the flavors? Making your own Trail Mix Cookies from scratch is not only a healthier choice but also keeps your wallet happy.
Customization Galore: Want them spicier? Toss in some cinnamon or nutmeg. Looking for a tropical twist? Swap dried cranberries for pineapple. No limits here!
Simple Yet Satisfying: Even if you’re a beginner baker, you’ll find this recipe approachable. It’s streamlined and requires only simple steps, getting you from prep to plate in about 30 minutes.
Obscene Deliciousness: When it comes down to it, the moment you sink your teeth into one of these cookies, the gooey dark chocolate and wholesome crunch of seeds will win your heart over.
With all these reasons, I can promise you won’t just be baking cookies; you’ll be crafting joyful experiences in your kitchen!
{image_template}
Ingredients
Before we jump into the creation process, here’s what you’ll need for these delicious Trail Mix Cookies:
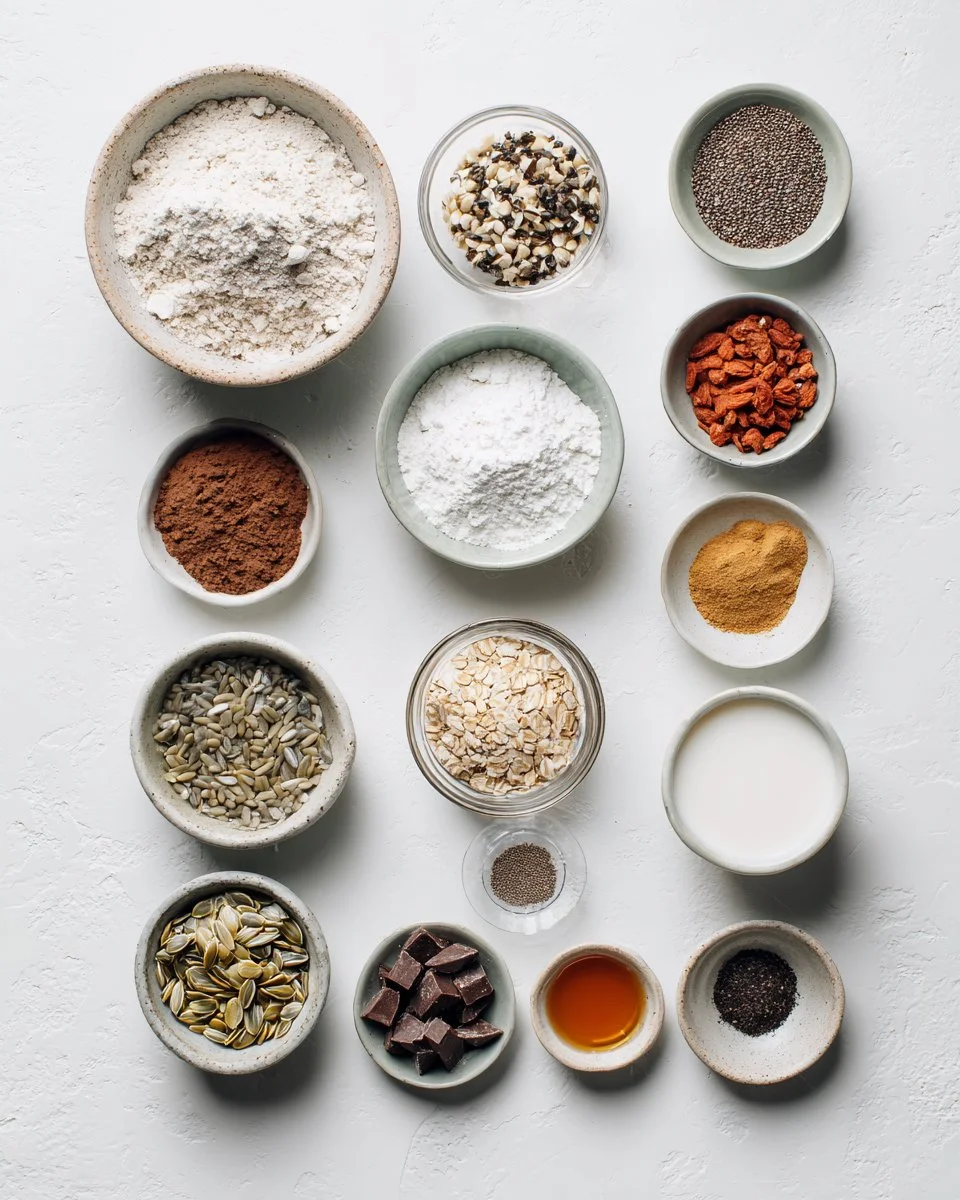
- 120 grams (1 cup) buckwheat flour: Gluten-free yet hearty; it gives the cookies a lovely nutty flavor.
- 110 grams (1 cup) oat flour: Adds fiber and a soft texture—if you don’t have oat flour, you can blend rolled oats in a food processor until fine.
- 80 grams (1/2 cup) coconut sugar: A natural sweetener with a caramel undertone that balances the flavors beautifully.
- 1 tablespoon arrowroot flour or 2 teaspoons cornstarch: This acts as a binding agent, giving an almost chewy texture.
- 1 teaspoon cinnamon: The warm spice brings out the natural sweetness.
- 1/2 teaspoon baking soda: Your secret weapon for a fluffy cookie!
- 1/2 teaspoon sea salt: A pinch enhances all flavors.
- 150 grams (1 cup) mixed seeds or nuts: Go for pumpkin and sunflower seeds, or use whatever you have on hand!
- 60 grams (1/4 cup) dried cranberries or other dried fruit: For a chewy and sweet pop.
- 100 grams (1/2 cup) dark chocolate, chopped: The richer, the better! Choose something at least 70% cocoa.
- 50 grams (1/4 cup) chia seeds: These little powerhouses add fiber and omega-3 fatty acids.
- 75 grams (1/4 cup) nut or seed butter (unsweetened): Almond or peanut butter works wonders here.
- 60 grams (1/4 cup) coconut oil, melted: Opt for unrefined for the best flavor.
- 80 ml (1/3 cup) non-dairy milk: Almond or oat milk complements the cookie without overpowering the flavors.
- 2 tablespoons maple syrup: For that extra touch of sweetness, kick-starting the caramel notes from the coconut sugar.
Notes: Make sure all ingredients are at room temperature for the best texture, especially the nut butter and coconut oil. If you’re looking for brand recommendations, Nutiva for coconut oil and Bobs Red Mill for flours work like a charm.
Step-by-Step Instructions
Let’s get baking! Follow these straightforward steps for your Trail Mix Cookies:
Prepping Your Dry Mix: In a large bowl, combine the buckwheat flour, oat flour, coconut sugar, arrowroot, cinnamon, baking soda, and sea salt. Whisk them together to eliminate any lumps—this step is crucial for even distribution.
Mix in the Fun Stuff: Stir in your mixed seeds, dried cranberries, chopped dark chocolate, and chia seeds. If you decide to substitute, ensure that any add-ins don’t replace the chia seeds, as they help with binding.
Combine the Wet Ingredients: In another bowl, whisk together the nut butter, melted coconut oil, non-dairy milk, and maple syrup until smooth and creamy. This mixture brings the cookie dough to life!
Combine the Two Mixtures: Pour the nut butter mixture into the dry ingredients. Mix until it’s fully combined, and no flour streaks remain. Let the dough rest while you preheat your oven to 180°C (350°F).
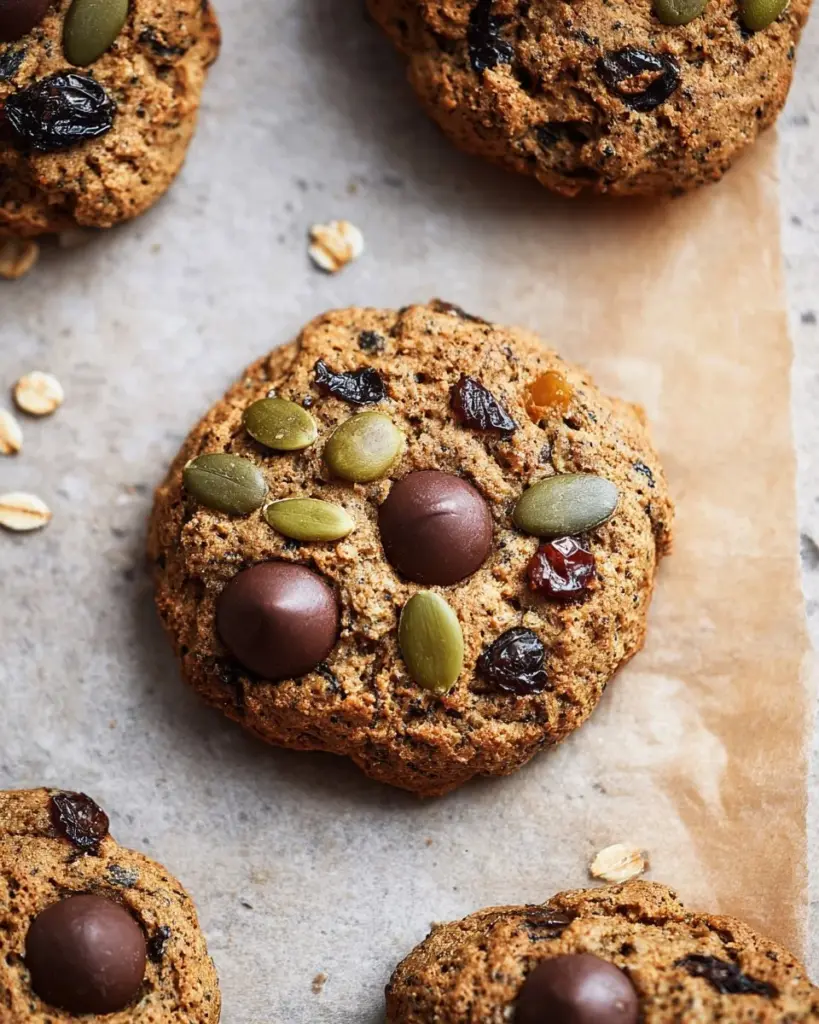
Shape the Cookies: Line two baking sheets with parchment paper. Using about two tablespoons of dough for each cookie, roll them into balls and then flatten them slightly with the palm of your hand.
Bake Them Up: Arrange the cookie dough balls approximately 5 cm (1.5 inches) apart on your prepared sheets. Bake for 8-10 minutes, or until they are lightly golden around the edges.
Cooling Down: Once you take them out, let the cookies cool on the tray for a few minutes before transferring them to a wire rack.
Storing: Keep your cookies in a sealed container. They’ll last at room temperature for about a week, or in the fridge for longer freshness.
Chef’s Tips:
- Don’t overmix your dough; it’ll make the cookies tough.
- Keep an eye on the baking; once you smell that delightful aroma, they’re close!
- Allow them some time to cool as they will firm up, so resist the urge to dive in immediately!
Expert Tips & Tricks
To get the most out of your Trail Mix Cookies, keep these tips in mind:
Storage Recommendations: These cookies can be stored in an airtight container at room temperature for up to a week. If you plan to keep them longer, pop them in the fridge for fresh taste.
Make Ahead: You can prepare the dough, shape it into balls, and freeze them in a sealed bag. When you need a cookie fix, just bake them straight from the freezer, adding an extra minute or two to the baking time.
Troubleshooting: If your cookies spread too much, check if your coconut oil was too warm. You want it melted but not hot; this will maintain their lovely shape.
Chilling Your Dough: If time allows, chill your dough for about 30 minutes before shaping. This helps control spreading while baking.
Experiment: Feel free to mix and match add-ins based on what you have on hand—think coconut flakes, dried apricots, or even spices like nutmeg!
Gifting: Wrap these cookies in a festive box for gifts or potlucks! Everyone will appreciate the love baked within!
Serving Suggestions
These Trail Mix Cookies are versatile enough to be enjoyed on their own, but here are some fun serving ideas:
- Serve with Milk: A classic! Pair your cookies with a glass of almond or oat milk for a delightful snack break.
- Nut Butter Dip: A little extra nut butter for dipping never hurt anyone! Spread some almond butter on top for added flavor.
- Cheese Platter: They make an unexpected yet delightful addition to a cheese charcuterie board, pairing well with sharp cheeses.
For a cozy gathering, lay out a spread of these cookies alongside coffee or herbal tea—perfect for afternoon relaxation.
Variations & Substitutions
Don’t shy away from tweaking this recipe! Here are some ideas to consider:
- Chocolate Lovers: Swap in white chocolate chips or even peanut butter chips for a delightful variation.
- Nut-Free Option: Simply use seed butter like sunflower seed butter instead of nut butter to make this nut-free for school snacks.
- Flavored Variations: Add lemon or orange zest for a fresh twist on the usual flavors, or infuse some vanilla extract into the wet mix!
Nutrition & Storage Info
- Prep Time: 10 minutes
- Cook Time: 10 minutes
- Total Time: 20 minutes
- Yield: About 12 servings (2 cookies per serving)
- Estimated Calories: 150 calories per cookie
- Storage: Keep in an airtight container; lasts for up to a week at room temperature, 2 weeks in the fridge, or freeze for up to 3 months.
FAQ Section
Can I use regular flour instead of buckwheat and oat flour?
- You can, but the gluten will change the texture. Buckwheat and oat flour add a unique flavor profile and nutritional boost.
How do I store leftover cookies?
- Make sure to cool them completely before placing in an airtight container and store them at room temperature or in the refrigerator.
Can I omit the chia seeds?
- Yes, but they provide great texture and added nutrition. If omitted, slightly increase the nut butter or oil to maintain moisture.
How can I adapt this recipe to be vegan?
- This recipe is already vegan! Just ensure all your ingredients (like chocolate and nut butter) are labeled as vegan.
What can I substitute for maple syrup?
- Agave syrup or honey (if not vegan) would work as great substitutes for sweetness!
Can I add protein powder to the recipe?
- Yes! You can swap up to 1/4 cup of flour with your favorite protein powder for an extra boost.
Can I double the recipe?
- Absolutely! Just make sure to bake in batches if your oven space is limited.
Are these cookies gluten-free?
- Yes, they are naturally gluten-free thanks to buckwheat and oat flour.
Do I need to chill the dough?
- Chilling is not necessary, but it can help with preventing spreading for thicker cookies!
What’s the best way to soften coconut oil?
- You can microwave it for a few seconds or let it sit at room temperature until softened.

Conclusion
Making these Trail Mix Cookies not only allows for a delicious snack but also a pathway to creating joyful memories in the kitchen. Bringing the family together with the delightful smells wafting from your oven can turn any ordinary day into something special. I encourage you to try this recipe and share your thoughts. Did you personalize your batch? What flavors did you discover?
If you enjoyed this, be sure to check out my other cookie recipes like my Soft Chocolate Chip Cookies or Delicious Creamy German Hunter’s Sauce to Elevate Your Meals for more baking adventures.
Happy baking!
Trail Mix Cookies
Ingredients
Method
- In a large bowl, combine the buckwheat flour, oat flour, coconut sugar, arrowroot, cinnamon, baking soda, and sea salt. Whisk to eliminate lumps.
- Stir in the mixed seeds, dried cranberries, chopped dark chocolate, and chia seeds.
- In another bowl, whisk together the nut butter, melted coconut oil, non-dairy milk, and maple syrup until smooth.
- Pour the wet mixture into the dry ingredients and mix until fully combined and no flour streaks remain. Let the dough rest while preheating the oven to 180°C (350°F).
- Line two baking sheets with parchment paper. Roll the dough into balls using about two tablespoons for each cookie, then flatten slightly.
- Arrange the cookie dough balls approximately 5 cm (1.5 inches) apart on the prepared sheets.
- Bake for 8-10 minutes or until lightly golden around the edges.
- Let cool on the tray for a few minutes before transferring to a wire rack.